N63 SPARK PLUG CHANGE DIY
SUCCESS!
Ok this wasn't a bad job all in all. 45k miles in and a fairly clean engine bay.
Took me about 4 hours going slow and removing a bit more stuff to get good access (see below).
THANKS to all for the info supplied before me, and the other pics in this thread....
I purchased the correct "bi-hex" plug socket in advance for under $10:
https://www.ebay.com/i/201434600961?chn=ps&dispItem=1
and a set of 8 Bosch spark plugs from ECS Tuning for $76 - p/n 12120037580KT2KT, ECS p/n 2794871
TOOLS:
A couple diff sockets for various hose clamps -6mm and bolts -10mm, brace bolts -15mm.
A small torx bit for shroud silver screws,
Ratchet + one or two 8" extension +u-joint + spark plug socket (above) - (I duct taped the socket to the u-joint to the extension, but since the above plug socket has metal grippers inside and not rubber, it didn't feel like it would have gotten stuck on the plugs. Test fit yours and use your judgement. Having it pull off your ratchet and get stuck on the plug would NOT be fun)
Torque wrench for installing new plugs (17 lb-ft)
The process is a bit like the above X5M S63 DIY link (
http://www.xbimmers.com/forums/showthread.php?t=1080563)
However there were some differences on the N63:
- Fold away black bulb over the spark plugs - This did not exist
- Remove the coolant reservoir tank - This did not apply
- I had to remove a few other bits...
Basically I did THIS:
1 - Remove silver engine top cover, Its got 4 or 5 little connecting nubs underneath that seat into receiving holes.
2 - Pull out/remove the long L&R molded plastic air ducts that run from above radiator to the air filter housings. They basically just pull right off front and rear, might have to wiggle them a bit.
3 - I removed the two plastic trim pieces along windshield (turn plastic nuts 90-deg, pull out). Then under those, remove all three plastic bulkhead shrouds (aka engine partition), L & R, then Center. NOTE which screws you pull out from where, you will need to re-install the black ones near the fenders, and the silver ones more toward the center.
*These shrouds are the ones noted in another thread that get brittle and crack and can leak water onto the engine (I know there are part #s listed in that thread). Two of mine were cracked severely (R&C). Passenger side was ok, but I ran down to BMW dealer and bought a set of 3 new ones. Keep and re-use original screws!
Sorry, I should have taken pics of all these but its just trim

Instead here is a link to a thread with a video of removal of these parts, as well as the cabin air filter in Step 4 below:
http://www.bimmerfest.com/forums/sho...d.php?t=899282
4 - Remove the Cabin air filter housing on passenger side. A few plastic screw nuts just rotate 90-deg and it pulls up and out. See video above. Good time to install a new set of cabin air filters.
5 - With the shrouds and Cabin air filter housing out of the way you can now easily access and remove the two silver aluminum strut tower braces that connect from each wheel well to the center of the bulkhead.
6 - Remove the short rubber L&R boots between the front of the air filter housings and the turbo inlets. 2 hose clamps each.
*Notice how far each rubber boots overlap on the front and rear plastic pieces, and try to fit them the same way on re-assembly.
7 - On each L&R air filter housing, need to unplug the sensor wire connector on the front edge, release metal locking tab on red locating nub. On Driver side air filter housing, there is a large black braided hose that you need to unhook from a clip on the housing before you remove it.
8 - Pull each air filter housing straight up while rocking it a bit. There are 2 locating nubs on the bottom that will just pull free. Now is the time to install new air filters into these housings, as I should have...)
Behold, you can see all 8 coils now! The connectors on top are marked with the little white dots on them.
NOTE you can now also see the two "nubs" on the head that the air filter housing seats onto...
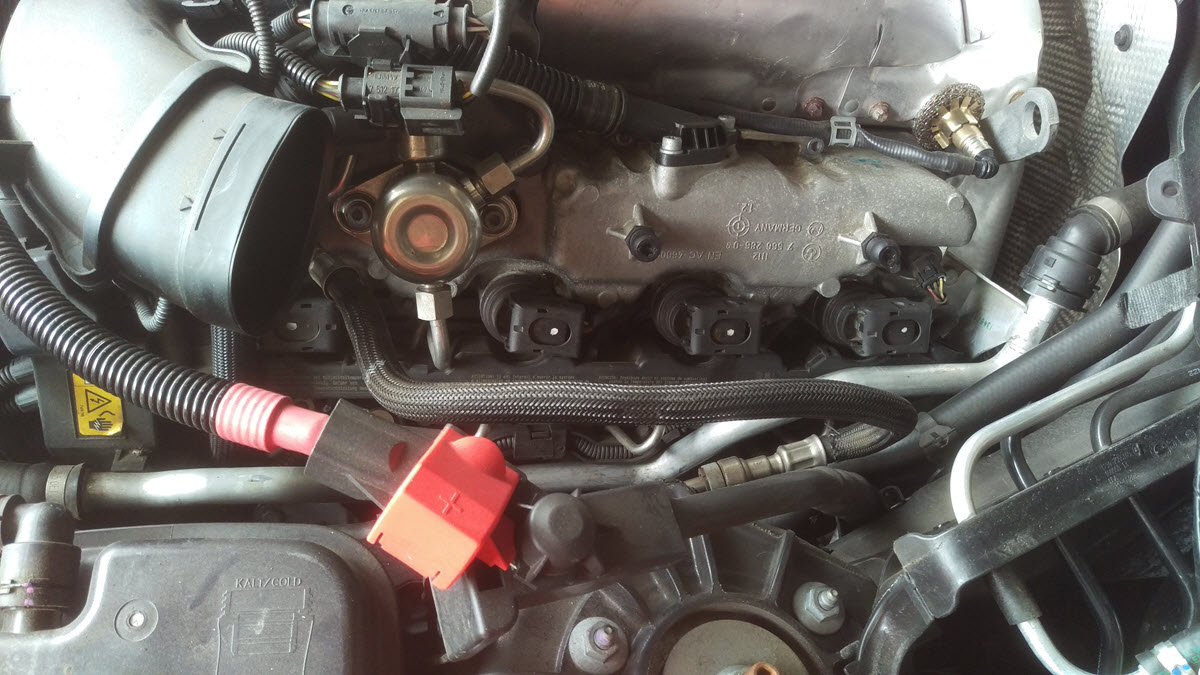
With the above shroud and brace removed, there is NO ISSUE getting to the rearmost coil/plug.

And Passenger side... Why does the front coil have TWO white dots??

*Before step 9 I used a leaf blower to blow all dust and foreign items away from the heads...
9 - My coils all pulled off with no drama. First you lift the connection clips up to disconnect the plug wires. I used a large screwdriver through the hole in the now raised clip, and firmly pulled them stright up and off. A few of mine had a satisfying suction pop when they came off.
Note - The most forward coil on each side of the engine faces/connects to the plug wire toward the front, while the rest connect toward the rear. Remember this for re-install. Also those same coils are a bit crowded by other wiring, but you can bend that stuff a little to gain access ok.
A few of the coils!

10 - I changed the 4 driver side plugs first, using the proper spark plug socket/u-joint/extension combo. A little muscle should remove them without issue. Finger thread in new plugs at first to make sure they are correct. I had zero issues getting them threaded. Note the 5-deg angle upward of the plugs in the hole. Torque spec is on the box for the plugs - 17 lb-ft. I did not use any anti-seize; should I have??

*At 45k miles, my old plugs were a medium grey color and dry. I think that's good

Though check out the one on the right with more crud buildup than the rest...
Overall I would say that these ought to be changed a bit more often than the 45k the dealer told me.
Driver side

Passenger side

11 - Replace all coils, facing same direction they were to begin with - front one to the front, rear three toward the rear. You can slightly rotate them before pushing all the way in. Connect plug wires and swing the top latch down to fully seat the connectors. On a couple coils I found it easier to connect the wiring BEFORE pushing the coil quite all the way in.
After wiring is connected and latch is pushed down you can push on the top of that connector/latch to firmly seat the coils down onto the plugs.
12 - Proceed to Passenger side. Very much the same as Driver side.
13 - Re-Assembly is exactly reverse of the above going from step 8 to step 1. Connect the wiring connectors where needed. Gently rock the air filter housings back onto their underneath nubs while pushing them down (taking a glance at the underside to see where they fit helps, see the nubs on the heads in above pics)
DONE!
If I need to do this again I should be able to cut the time in half easily.
Additional notes on plastic shrouds (step 3):
- I read another thread and these "shrouds" I keep referring to are also known as the "engine partitions".
- The new set of 3 OE pieces were $190 with CCA discount! But they seem to be a different material, maybe more composite than plastic. Hopefully an improvement. Also, the middle piece of the three connects to yet a FOURTH plastic piece up under the windshield. THIS piece partially disintegrated on me when I tried to re-attach the center piece to it. I intend to purchase a new one and replace it soon. Only the shrouds need to be removed to access this piece. I hope! Will look at the parts diagrams first.
- Part #s are 51.71.7.169.419 / 51.71.7.169.420 / 51.71.7.169.421