


|
|
|
| 11-18-2019, 06:23 PM | #1 |
|
Captain
 581
Rep 672
Posts |
Custom Turbo Inlet System for my X5D
I wanted to share a recent project on my X5D.
Disclaimer: This isn't a step by step guide however for those inclined DIYers all the critical information is covered and the process is outlined, there should be adequate information to build your own replica if you fancy. Follow at your own risk, do your own research, and take responsibility for your work. No that this is done.... The goals: - Improve turbo response by shortening intake length and increasing air flow potential - Retain "cold" air source - Simplify system to make engine access easier - Clean OEM+ aesthetics I have yet to confirm the performance gains of the system but once I get my X5 tuned I plan to get some back to back dyno runs comparing the custom inlet vs stock airbox. I would love to find a race shop that can bench dyno the CFM too. This system was "engineered with common sense" so it would be nice too see some data to confirm the increase in performance ....or show that I wasted my time  Hopefully #CommonSenseEngineering prevails. Hopefully #CommonSenseEngineering prevails.Here is the parts list, if they were modded those details are below: - K&N RC-5000 Filter - K&N RC-70031DK Dry-Charger - 3.5" 45 Elbow - 3.5" 90 Elbow (4" legs recommended) - 3.5"-3" Reducer (3" length) - 3.5" Aluminum Joiner - HPS SSWC-59-83 x1 - HPS SSWC-84-108 x4 - Pro Fabrication 3.5" Oval 90 Pipe https://www.profabrication.com/3-5-x...l-bend-ms.html Parts ran me ~$300 Here was when the idea was conceived. Happy to say this state-of-the-art scribble turned out to be fairly accurate.  The star or this inlet system is the 3.5" 90 degree oval piping as retains the 3.5" diameter while clearing the hood once it's shut. Originally I was looking at a 3.5" oval pipe from CX Racing that was aluminum but I went this Pro Fab pipe because it has a tighter 4" radius, I called CX Racing and asked them for the specs but they didn't know (must be lost in China somewhere, lol). If I had to guess the CX piping is 4.5-5" radius, either way the 4" of the Pro Fab is extremely helpful. *This Pro Fab pipe is mild steel and starts to rust if you look at it wrong so plan to seal/protect it somehow. Here is the original pipe being test fit  In an ideal world I would maximize the amount of metal and minimize the amount of silicone used to construct the inlet but the direct routing to the turbo meant form will follow function. Here is what I was eyeing up.  The oval pipe fit snugly into the oem hole in the shroud but the pipe needed to sit lower for hood clearance. This is without trimming, notice the height relative to OEM.  If you look closely at the edge of the green tape you can see there was a circular cutout in the radiator shroud so I trimmed the plastic on top and did my best to make a clean cut.  I did an initial trim of the oval pipe.  With the oval pipe and the radiator shroud trimmed fitment was much better, notice how low the pipe sits now, very similar to the stock snorkel.  I had to take some more length off the oval pipe to help straighten the routing. Here is after final trimming. I don't have the exact measurements but there is about 1" of leg (past radius bend) that goes towards the filter, the other end which runs to the turbo is slightly longer with ~2" of leg.  Here is the OEM turbo inlet removed from the X5  We won't be needed the top part and thankfully the PCV connection is built into the lower pipe. With the upper portion removed I noticed there was a large flange, this isn't ideal.   Using a sanding wheel I removed the outer lip and bored out the inside to make a nice smooth transition.   For good measure I bored out the MAF as well.  This is the 3.5" joiner I use between the silicone 90 and 45. It has a bead as it's intended to be used as charge piping.  That bead will only disrupt air flow so I trimmed off each bead to keep things smooth. Not pictured but you can notice this when observing the final product but I stuck this 3.5" pipe in my bench vise and made it oval to help keep continuity in the shape of the piping.  If you look closely you can see the oval piping is slightly concave on the long sides, this is a byproduct of the bending process.  To alleviate this I used some JB Weld to fill in the small dips on all 4 sides.   After the JB cured over night it was time to sand, clean, prep, prime, and paint. I used some high temp stable engine paint and added further protection with a top layer of ceramic coating. Hopefully this resists paint chips when I inevitably remove the inlet for more wrenching.  Once I got the general routing of the system down my attention focused on filter location. I was adamant about the filter being vertical and NOT contacting the shroud or radiator, or poking through towards the kidney grills so aligned the filter where I wanted it and worked backwards aligning and trimming if needed. After achieving ideal filter location and confirming there would be no contact with the hood shut I looked into ways to secure the system. I was thinking about L-brackets and all kinds of serviceable mounting solutions but once I had the system mocked up I realized the system was fairly rigid. The silicone does offer some flex but considering the short length of the system overall and the M57 doesn't seem to move much underload, the intake wasn't flopping around, it was barely moving at all. My solution was using a small rubber disc I had laying around, I attached some 3M VHB, and use this is a locating /buffer for the hose clamp. After some test drives and manyu WOT pulls I confirm this works like charm. The only contact points for this whole system are this and where the OEM turbo inlet bolts to the turbo. Very happy about this.   *Depending on what length 45 degree silicone elbow you buy your trimming may differ but I took about 1" off each end of mine. Also the 90 degree silicone elbow w/ 4" legs was also trimmed, I took about 1" off the end that connects to the MAF. *Also not pictured but the opening of the K&N filter is larger than the 3.5" oval piping. The trick is to take one of your 1" silicone trimmings and use that as a spacer. -Slide the 1" long ring of silicone onto the forward edge of the oval pipe and then install your filter, works like a charm and you can recycle! Look closely at the pics below and you can see the silicone sticking out where the filter mounts. For added security you can add a K&N Dry-Charger which is a hydrophobic filter guard, great for dust and water.  Let's first take a look at the stock intake system  ...and a peak inside, notice the entire filter is not utilized  Now the final product     Installed   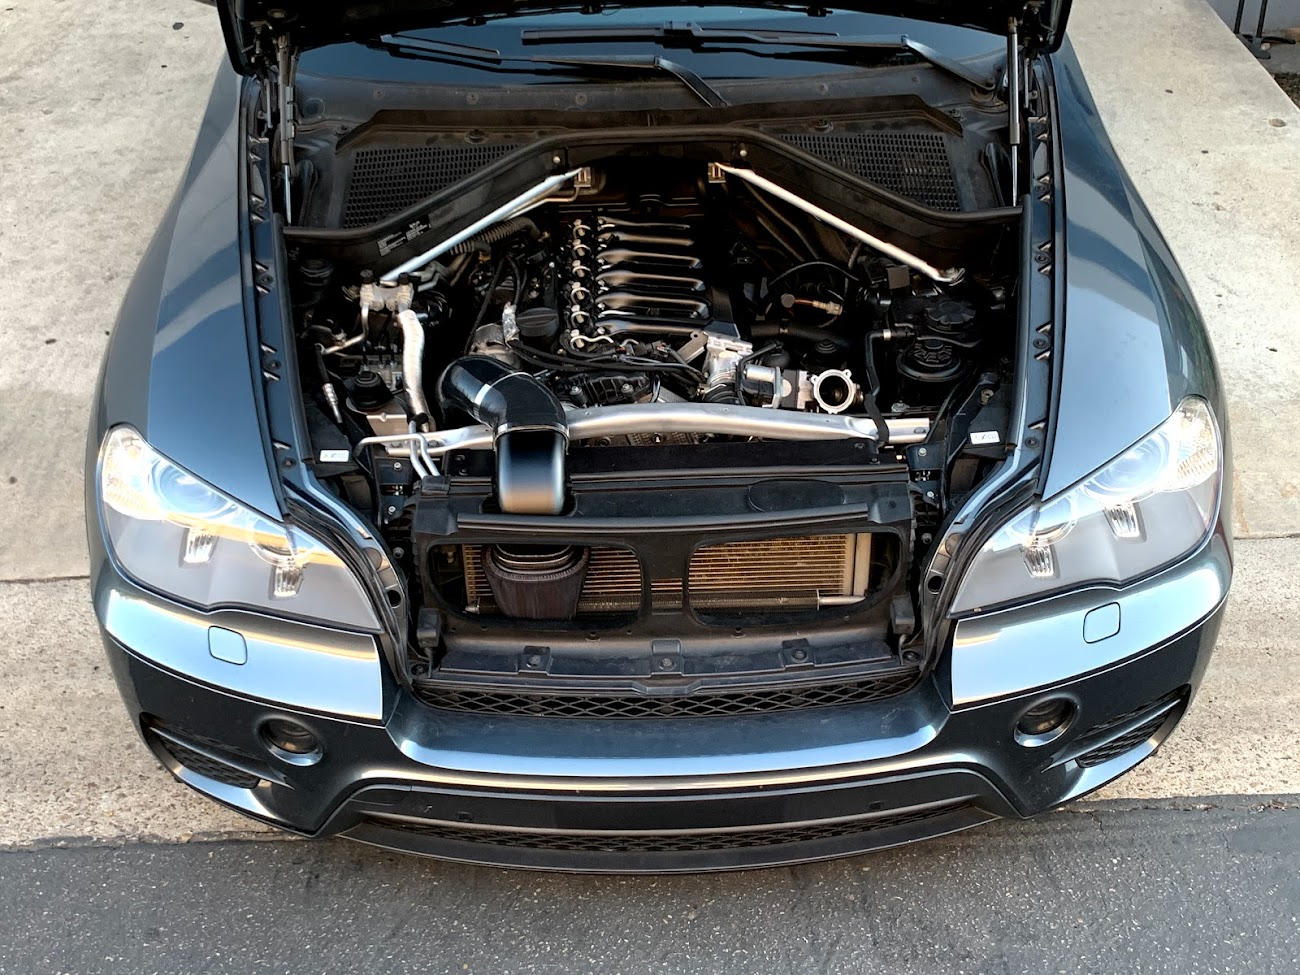 
__________________
N54 Powered M5 Wagon:
- M5 Shaft, M5 LSD, M5 Axles, M5 Brakes, M5 Front End, M5 skirts, M5 Mirrors - Manual Swap, MFactory SMFW, Spec Stg 3+, KW V3, RD Sport Sways, F14 SDC - EOS Port Injection Manifold, Fuel-It: Stg 2 LPFP +Lines +Ethanol Sensor - JB4, Hexon RR550s, Custom Inlet, AR DPs, 3" Exhaust, VRSF 7" IC, ER CP +Tial |
| 11-20-2019, 09:12 AM | #6 | ||||
|
Captain
581
Rep 672
Posts |
Quote:
Quote:
Quote:
Quote:
__________________
N54 Powered M5 Wagon:
- M5 Shaft, M5 LSD, M5 Axles, M5 Brakes, M5 Front End, M5 skirts, M5 Mirrors - Manual Swap, MFactory SMFW, Spec Stg 3+, KW V3, RD Sport Sways, F14 SDC - EOS Port Injection Manifold, Fuel-It: Stg 2 LPFP +Lines +Ethanol Sensor - JB4, Hexon RR550s, Custom Inlet, AR DPs, 3" Exhaust, VRSF 7" IC, ER CP +Tial |
||||
|
Appreciate
0
|
| 11-20-2019, 12:20 PM | #7 | |
|
First Lieutenant
170
Rep 327
Posts |
Quote:
|
|
|
Appreciate
0
|
| 11-20-2019, 12:39 PM | #8 | |
|
Captain
581
Rep 672
Posts |
Quote:
335Ds only have 1 egr cooler (mani-intake) X5s have the additional EGR from DP-low pressure turbo and it has an wavy flex section so it's the obvious suspect right now. It has to be it, we will know shortly! The intake is very sturdy and dampened with rubber or silicone at every contact point.
__________________
N54 Powered M5 Wagon:
- M5 Shaft, M5 LSD, M5 Axles, M5 Brakes, M5 Front End, M5 skirts, M5 Mirrors - Manual Swap, MFactory SMFW, Spec Stg 3+, KW V3, RD Sport Sways, F14 SDC - EOS Port Injection Manifold, Fuel-It: Stg 2 LPFP +Lines +Ethanol Sensor - JB4, Hexon RR550s, Custom Inlet, AR DPs, 3" Exhaust, VRSF 7" IC, ER CP +Tial |
|
|
Appreciate
0
|
| 11-20-2019, 03:01 PM | #9 | |
|
First Lieutenant
170
Rep 327
Posts |
Quote:
Sounds good. My DP had a lower egr block plate to bolt to luckily. Time to put in a strut tower bar now that you made room in the right places  |
|
|
Appreciate
0
|
| 11-20-2019, 09:46 PM | #10 | |
|
2022 M4 Comp Xdrive
1012
Rep 1,532
Posts |
Quote:
They make them for other BMWs but now ours since the market is small. Like this... https://ae01.alicdn.com/kf/HTB1GM90QXXXXXbCapXXq6xXFXXX3/201020752/HTB1GM90QXXXXXbCapXXq6xXFXXX3.jpg_640x640q90.jpg https://www.***********.com/showthread.php?68795-My-New-to-me-X5m-with-Jailbreak-tune-Affluence-scoops-and-exhaust Could you make this? I would be very interested! |
|
|
Appreciate
0
|
| 11-21-2019, 10:57 AM | #11 | ||
|
Captain
581
Rep 672
Posts |
Quote:
 Quote:
__________________
N54 Powered M5 Wagon:
- M5 Shaft, M5 LSD, M5 Axles, M5 Brakes, M5 Front End, M5 skirts, M5 Mirrors - Manual Swap, MFactory SMFW, Spec Stg 3+, KW V3, RD Sport Sways, F14 SDC - EOS Port Injection Manifold, Fuel-It: Stg 2 LPFP +Lines +Ethanol Sensor - JB4, Hexon RR550s, Custom Inlet, AR DPs, 3" Exhaust, VRSF 7" IC, ER CP +Tial |
||
|
Appreciate
0
|
| 07-18-2021, 12:35 AM | #12 |
|
New Member

0
Rep 5
Posts |
Intake Follow up
Hey Evan,
Great work here. I have followed a number of other threads you posted which have helped a whole bunch so thanks for that. I'm curious if you ended up doing a Dyno day for the custom inlet vs stock airbox? Contemplating doing this mod as I am currently full stock. I have a number of maintenance items to catch up on but turbo noises and such are definitely something I'm about so just looking for more info. Thanks ! -Jake Last edited by JakemE70; 07-21-2021 at 01:20 PM.. Reason: Post too long |
|
Appreciate
0
|
| 07-21-2021, 11:11 AM | #13 | |
|
Captain
581
Rep 672
Posts |
Quote:
Also, if the forum allows you to edit your post do you mind removing the quote? You quoted the entire post so the thread is now much longer with duplicate info. People always complain that my threads are too long with a lot of details (lol) so if possible I try to keep them tidy as to not "overwhelm" people. I appreciate it! 
__________________
N54 Powered M5 Wagon:
- M5 Shaft, M5 LSD, M5 Axles, M5 Brakes, M5 Front End, M5 skirts, M5 Mirrors - Manual Swap, MFactory SMFW, Spec Stg 3+, KW V3, RD Sport Sways, F14 SDC - EOS Port Injection Manifold, Fuel-It: Stg 2 LPFP +Lines +Ethanol Sensor - JB4, Hexon RR550s, Custom Inlet, AR DPs, 3" Exhaust, VRSF 7" IC, ER CP +Tial |
|
|
Appreciate
0
|
Post Reply |
| Bookmarks |
| Thread Tools | Search this Thread |
|
|


