


|
|
|
| 10-03-2019, 02:25 PM | #111 |
|
Captain
 581
Rep 673
Posts |
First things first, welcome the new garage mate: Oliver! Soon to be 3 month old Blue Merle Australian Shepard.
   Back to the basics: fresh oil  Next project was to run the wiring for my paddles, the electrical pins are in the mail so I figured it would be good to get the wiring done. I started by removing the wheel so confirm the M-sport paddles are configured like other M-sport paddles with resistors ...and they are. M-sport owners on other chassis remove the resistors to create a simple switch, others add additional resistors but in the spirit of KISS, I will explore a coding option I read about which will allow communication, if now then I have the other more permanent options to explore.    After some poking around I decided to run the wiring in this manner from the SZL; through the fire wall just above the dead pedal, from just under the brake booster out another grommet to the driver wheel well, up and over the transmission, and back to the electrical connector. There might have been a more direct way but this was fairly easy to access and the wiring is away from all the hot items on the passenger side.  Grommet above the dead pedal  View of the grommet below the brake booster  Thread the needle  In this pic you can see the wire ran behond the wheel liner. Wiring is tucked away as I wait for the pins to arrive.  Next project was aligning the rear tailgate which was pulled over to the passenger side. Using NewTIS I found the instructions for aligning the gate and played around with the loosing the bolts which connect the hinge to the body and the gate, it was a pain and didn't really work. To access these bolts you had to remove the spoiler.  Here is before   It isn't perfect but the most beneficial adjustment came from correcting the latch catch. If you lowered the tailgate down manually to where it was almost shut you could see it was pretty straight but then got all crooked when latched, DOH! I should have paid closer attention, removing the spoiler and playing with the main hinge wasn't necessary SMH. I also noticed the passenger side "bottom-out pad"? was about 5 millimeters higher so I brought that down to level. Maybe it was raised earlier to eliminate tailgate rattle? We shall see.  Here is after, not perfect but much better   Added some fresh felt tape to the latch catch.  Last project was fabbing up a PCV delete plate which will eventually house a bulkhead fitting and allow me to run an oil catch can. Just as others have done I used 1/3" aluminum hacked it up with an angle grinder and a Dremel. Considering my lack of metal fabrication experience and relatively primitive tools I am happy with the outcome. I bought a small vented Mishimoto "style" OCC but I know the Provent is the go-to for the M57 with a few internal mods. TBH the Provent is huge and looks like hell so I will see if I can get satisfactory results for another style OCC, if not then I will revert to the Provent and it's unsightly "do they really need to be this large of a diameter" hoses.       Good enough!  Keep it clean! 
__________________
N54 Powered M5 Wagon:
- M5 Shaft, M5 LSD, M5 Axles, M5 Brakes, M5 Front End, M5 skirts, M5 Mirrors - Manual Swap, MFactory SMFW, Spec Stg 3+, KW V3, RD Sport Sways, F14 SDC - EOS Port Injection Manifold, Fuel-It: Stg 2 LPFP +Lines +Ethanol Sensor - JB4, Hexon RR550s, Custom Inlet, AR DPs, 3" Exhaust, VRSF 7" IC, ER CP +Tial |
|
Appreciate
0
|
| 10-06-2019, 10:40 PM | #113 |
|
BobbyG6

2
Rep 4
Posts |
CCV Delete
ucsbwsr Thanks for your info. So if you block off that with an aluminum plate how do you route and install the Provent ? I saw another blog that did the similar but welded a 90 degree pipe to the aluminum and ran a hose off of that to the Provent.
https://www.e90post.com/forums/showthread.php?t=993228 Have you completed your's yet ? |
|
Appreciate
0
|
| 10-07-2019, 10:50 AM | #114 | |
|
Captain
581
Rep 673
Posts |
Quote:
The PCV connections on the M57 are not that large, maybe ~15mm ID or so but the Provent has hugemungeous ports so everyone runs these huge lines. My lack of experience with this stuff and common sense tells me to run lines which offer the same ID (or similar) to what the M57 already has. Smaller diameter lines means it's easier to have them be structurally stable. The last piece of the puzzle is the venting of the OCC. A total VTA setup on these motors can cause issues when there is no positive pressure at all. Provent has an internal valve which reacts to excessive pressure. The OCC I have has a regular VTA filter that sits on top but my thought is with the smaller ID vacuum lines there might be some resistance with the air running through the OCC that might keep things happy. Or perhaps I could tune the system by chocking or opening up the VTA port on the filter. Where the Provent is dynamic with it's internal valve my OCC would be more of a constant semi-vented. I need to research this more. As for the fitting on the aluminum plate, I plan to drill a hole and fit a bulk-head fitting that could screw on a bulk head fitting that could accept a barb of -AN hose, this would give me more fitment options as opposed to welding on a bung, important since this system is experimental and I might change configurations in the future.
__________________
N54 Powered M5 Wagon:
- M5 Shaft, M5 LSD, M5 Axles, M5 Brakes, M5 Front End, M5 skirts, M5 Mirrors - Manual Swap, MFactory SMFW, Spec Stg 3+, KW V3, RD Sport Sways, F14 SDC - EOS Port Injection Manifold, Fuel-It: Stg 2 LPFP +Lines +Ethanol Sensor - JB4, Hexon RR550s, Custom Inlet, AR DPs, 3" Exhaust, VRSF 7" IC, ER CP +Tial |
|
|
Appreciate
0
|
| 10-11-2019, 07:08 PM | #115 |
|
Captain
581
Rep 673
Posts |
I finished wiring the paddles and got everything operational. I will be creating a guide explaining the process for E70s, there was info online but it wasn't definitive so I am hoping the consolidation of the necessary steps plus some pointers will be helpful for others. Keep an eye out for a link soon.
In addition to the paddle shift project the maintenance train continued to charge forward with the following: - Fluidampr harmonic balancer + upgraded alternator pulley - Water Pump + Thermostat - New Belts  Removing AC stretch belt  Alternator pulley: Left-Old Right-New  Left: OEM balancer Right: Fluidampr  OEM HB looked to be in good shape. There was no record of it being replaced in 85k so it's nice to know the Fluidampr is in there now, especially before tuning.  Noted some minor wheeping around the crank hub, not an urgent matter but it will be corrected at some point.  Old vs New   Cleaned, inspected, and greased up.  Refilled cooling system and got up to operating temp. 
__________________
N54 Powered M5 Wagon:
- M5 Shaft, M5 LSD, M5 Axles, M5 Brakes, M5 Front End, M5 skirts, M5 Mirrors - Manual Swap, MFactory SMFW, Spec Stg 3+, KW V3, RD Sport Sways, F14 SDC - EOS Port Injection Manifold, Fuel-It: Stg 2 LPFP +Lines +Ethanol Sensor - JB4, Hexon RR550s, Custom Inlet, AR DPs, 3" Exhaust, VRSF 7" IC, ER CP +Tial |
|
Appreciate
0
|
| 10-12-2019, 03:35 PM | #116 |
|
Major

274
Rep 1,054
Posts |
Glad you got it all together! You must feel a whole lot better now knowing the HD isn't going to fail
") and that you did some preventative maintenance! and that you did some preventative maintenance! Your HD looked pretty dry rotted though definitely got it just in time!
__________________
2011 335d tuned by B.R.R.
2011 X5 35d tuned by B.R.R. |
|
Appreciate
0
|
| 10-16-2019, 11:33 AM | #117 |
|
Captain
581
Rep 673
Posts |
Paddles in action!
 Also, this chirping noise shown below would happen periodically on start up, usually when the engine hasen't been ran for >12 hours. This was resolved when replacing my harmonic balancer, alternator pulley, and water pump. My guess it was caused by the alternator pulley. I had some odd locking behavior, the driver door stopped unlocking at all and you needed to utilize the "actual" key however the driver door would lock with the FOB. Gas cap also needed a manual release to open. All other doors were unresponsive. Research said it was either a fuse or lock actuator. Thankfully it was a fuse, I replaced the 15A with 20A.   My initial fog light retrofit utilized 3M VHB which is amazing stuff but it didn't offer the structural rigidity needed for this application and with the heat sinks of the projectors completely exposed there was too much space for water and dirt to ingress so I revised the design. To mount the LED projector bracket to the fog housing I used my ultra tiny drill bit and some steel wire to create 4 anchor points  Next was JB Weld which completely seals the perimeter and also adds rigidity.  Last were rubber housing caps to seal the rear, these work but they are a little excessive in their volume and the flange that grabs onto the housings could be deeper so I will be trying a different design later to optimize the design.  I gave the X5 a wash immediately after installing the revised fogs and so far so good, next wash will be with a power washer    I finally had the opportunity to take some output pics. Some things to note on these photos: The X5 is parked at a slight angle relative to the wall and the ground also has a slight angle which makes the output scale up in size towards the left. I did a quick aim of the projectors inside the fog housings before installing them into the bumper but never did another aiming once in the bumper, as you can see the driver side is aimed a bit higher and should be lower to match the passenger side. The passenger side is aimed about as low as it can go, the projector assmebly bottoms out on the fog housing limiting the downward angle. I might be able to improve this a little by mounting the LED projector up a little higher in the fog housing when I join the two assemblies but the improvement will be small. The limited downward aim combined with the relatively high location of the fog lights in the X5's bumper these fog lights are more like supplemental driving lights. That being said with the ho-hum performance of the E70's adaptive xenon lights and the impressive output of the small LED fogs, they do a nice job complimenting the headlight's low beam output and help fill out the beam pattern. Photos are with an iphone and exposure is on auto. LED fogs only  Low beams only 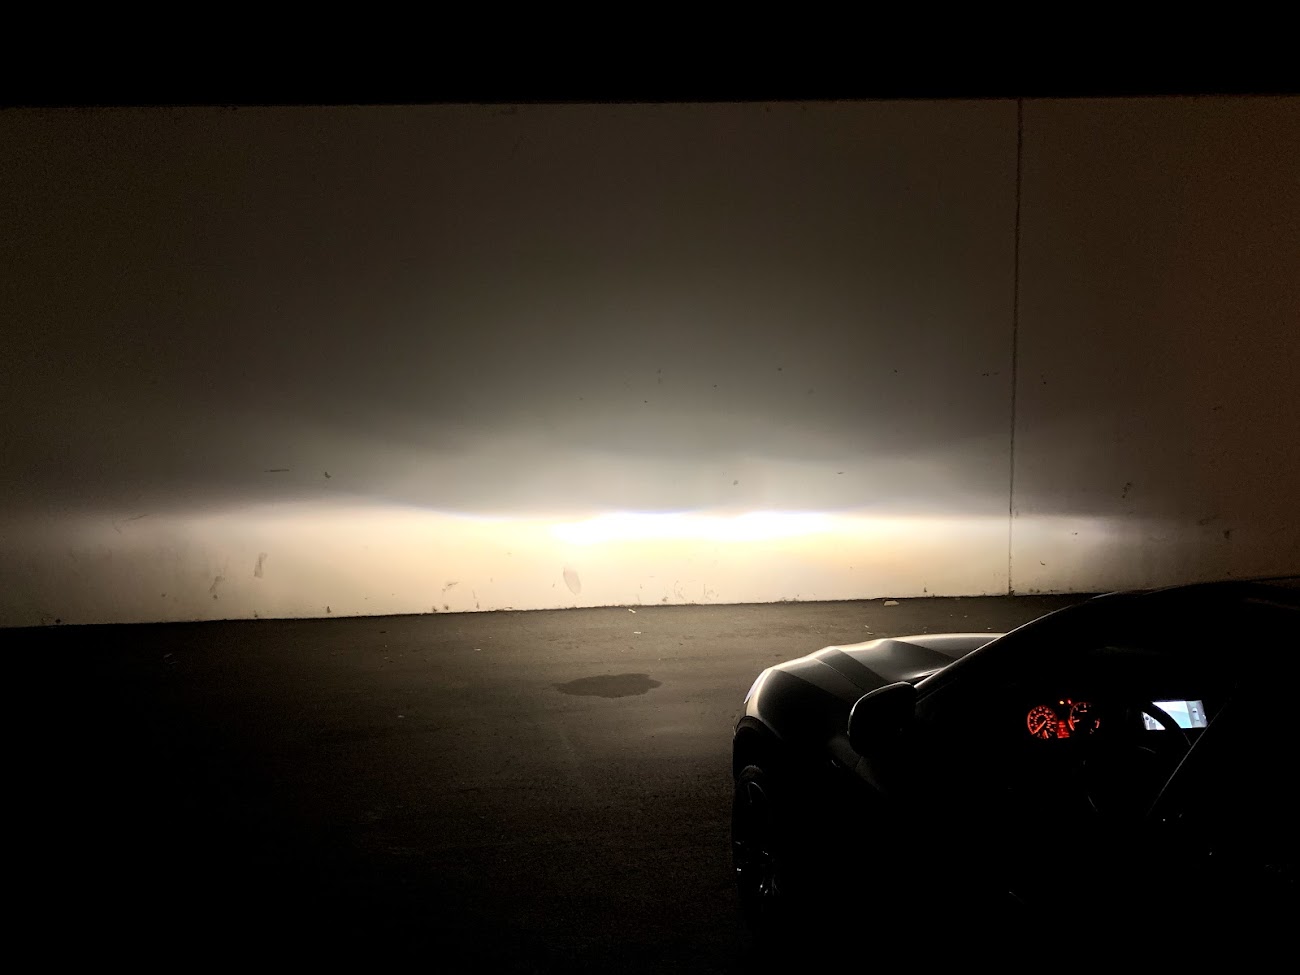 Low + Fog  Fog only  Here is a video cycling through the lights
__________________
N54 Powered M5 Wagon:
- M5 Shaft, M5 LSD, M5 Axles, M5 Brakes, M5 Front End, M5 skirts, M5 Mirrors - Manual Swap, MFactory SMFW, Spec Stg 3+, KW V3, RD Sport Sways, F14 SDC - EOS Port Injection Manifold, Fuel-It: Stg 2 LPFP +Lines +Ethanol Sensor - JB4, Hexon RR550s, Custom Inlet, AR DPs, 3" Exhaust, VRSF 7" IC, ER CP +Tial |
| 11-26-2019, 10:39 AM | #118 |
|
Captain
581
Rep 673
Posts |
Where to begin? Lots to cover so I will get to it.
I added twin Diode Dynamics Stage 6" "wide" light bars as reverse lights. I run a single DD bar on my E61 and it's amazing, this is double amazing. Tapped into OEM wiring, mounted to the subframe braces. These offer tons of light and with their optics and location tucked forward under the bumper you aren't going to be blinding people when reversing ...unless thy happen to be on their hands and knees for some reason.      Installed H&R 1.2 front springs, they come with adjustable links for the rear but before ordering the springs I already DIYed some adjustable links by modding the stock units. I hear mixed reviews on the H&R springs and the ride quality but I figured I would give them a shot and come to my own conclusion. I should really get some struts which are intended to operate lowered but as part of the experiment I wanted to see how the stock struts performed, I replaced thin bushings and upgraded from teh "3rd row" bump stops to the "sport."        Rear links set to 65mm as H&R recommends, I like the drop but those tires are a bit thin   I like custom stuff and I like turbo noises so I "built" aka trimmed and assembled some silicone and metal. The goal was to retain the cold air source like stock but shorten the intake ducting and hopefully increase turbo response and flow capabilities. Freeing up room in the engine bay is always a bonus. I plan on dyno testing this vs stock to confirm performance later. I have a detailed thread on this project in the forum, just search! Stock intake for reference  My intake     Thick boy tires. The Michelin PSSs originally on the 612M wheels were 285/35/21 and 325/30/21 A 30 profile tire is too thin IMO for a 5,000+lbs SUV. With the short gearing and only 6 spd trans on the diesel I wanted meatier tires to A) add comfort and B) give it some longer legs at highway speeds. The added rotational mass will hurt acceleration and braking a bit but I have some solutions lined up for that. These are Continental SportContact 5P 285/40/21 and 325/40/21 If you recall I test fit a 285/45 front tire that DIDN'T fit up front, that is the matching tire for these monstrous rear tires. With tire sizes limited in 21" I had limited options and this was staggered setup was my best option. I am not crazy about the Hot Wheels raked look but this was a function>form modification. The front tire looks perfect, if they made a matching 325/35 rear it would have been ideal buuuuuuut they don't! These rears have a 31" diameter!    At some angles the rear tires look out of place and at other angles they just look beefy. The exaggerated rear flares do help the rear meat blend in a bit.      Apparently the 3rd row got some use with the previous owner, good for them. Aside from a comical test to see if all 6'8" 255lb of me could fit in there I have never and will never use it. I bought the X5 with 3rd row for the load leveling so this seat is nothing but added weight and cargo space. 100lbs and 6 cu/ft of cargo space to be exact! I purchased some of the OEM cargo rails but will install once my new non-3rd row cargo floor arrives.    Now onto the good stuff. The diesel motor has been chock long enough, time to let that motor be efficient. In addition to the bump in MPG, and +150whp and +150wtq with the DPF, SCR, and Uerea tans gone that is another 100lbs lost.   Cleaning as I go   Fabbed up a block off plate for the low pressure EGR connection    Malone Tuning + Flashzilla tuning device. I currently have Stage 2, 2.5, and 2.9 to play around with. Currently running 2.9 and will data log and see if we can't make some tuning revisions to optimize everything.    Let's take a moment to appreciate this Rawtek exhaust, this features a 3.5" DP and an high flow cat in the mid-pipe. Rawtek is more expensive than other X5D exhaust options but with build quality like this the price is easy to justify for the discerning enthusiast.        The real headlight retrofit is coming soon until then I wanted to test out these new Philips XV2s.  Since removing the rear DVD system I had a void in the console, the gentleman who bought the system was supposed to send me his storage cubby but I never heard from him so I sourced the parts from eBay. Hard to see but now I have a place to put "oddments" as BMW would say.  With some exhaust sensors now rendered useless I went through the engine bay, removing what I could, rerouting some items, and giving a little nip/tuck to clean things up. Happy with how it is looking.  
__________________
N54 Powered M5 Wagon:
- M5 Shaft, M5 LSD, M5 Axles, M5 Brakes, M5 Front End, M5 skirts, M5 Mirrors - Manual Swap, MFactory SMFW, Spec Stg 3+, KW V3, RD Sport Sways, F14 SDC - EOS Port Injection Manifold, Fuel-It: Stg 2 LPFP +Lines +Ethanol Sensor - JB4, Hexon RR550s, Custom Inlet, AR DPs, 3" Exhaust, VRSF 7" IC, ER CP +Tial |
|
Appreciate
3
|
| 11-26-2019, 04:15 PM | #120 |
|
Capitan Slow Mods
27
Rep 56
Posts |
You can block off the low pressure EGR connection when deleted?? Does it leave a check engine light? I'm getting ready to do full deletes and am slowly pulling the truck apart to make modifications and remove unnecessary things.
|
|
Appreciate
0
|
| 11-28-2019, 01:08 PM | #121 |
|
Private
 18
Rep 69
Posts |
Can't appreciate your thread enough. Your DIY enthusiasm is contagious. I recently had a turbo return line leak that the dealer quoted 6k in labor to fix. I decided to get a quickjack and do it myself and am now thinking about upgrading the turbos while I'm down there.
Looking at ones from turbosystems.info, they quoted me 1050 shipped for the pair and they look amazing! |
|
Appreciate
1
Pudgypepper27.00 |
| 12-02-2019, 12:55 PM | #122 | |||
|
Captain
581
Rep 673
Posts |
Quote:
Quote:
Quote:
__________________
N54 Powered M5 Wagon:
- M5 Shaft, M5 LSD, M5 Axles, M5 Brakes, M5 Front End, M5 skirts, M5 Mirrors - Manual Swap, MFactory SMFW, Spec Stg 3+, KW V3, RD Sport Sways, F14 SDC - EOS Port Injection Manifold, Fuel-It: Stg 2 LPFP +Lines +Ethanol Sensor - JB4, Hexon RR550s, Custom Inlet, AR DPs, 3" Exhaust, VRSF 7" IC, ER CP +Tial |
|||
|
Appreciate
0
|
| 12-02-2019, 05:37 PM | #123 |
|
First Lieutenant
170
Rep 327
Posts |
Will definitely be stealing a couple of these ideas. The rear fog retro is amazing - always hated the lack of illumination in reverse. Did the sound of the intake clean up at all once you got the lower egr flow blocked? Can't wait to see what you have in store for the headlights, the last time I baked a set was years ago for a g35. Love how you get sh!t done, great initiative. Must love the way it's driving!
|
|
Appreciate
1
Spyro235259.50 |
| 12-03-2019, 08:16 AM | #124 |
|
Captain
260
Rep 714
Posts |
My rear 6"ers came in last friday. I'm going to try to install them this weekend, if I have time after installing my seats.
When you wired them into the backup lights, did you run a relay with a vampire clip on the backup light power switch? That's my current thought. Mind sharing how you have it wired? I also purchased a 12" driving pattern bar for the front. Going to put it behind the grill right below the hood, I'll have to come up with a cross brace to mount it on, but that shouldn't be too terrible when the bumper is off.
__________________
Daily/ Tow: 2010 X5 35D - 326k, Deleted w/DUDMD Stage 2, Sutphin Trans tune, Comfort seat retrofit
Fun car: 2004 ZHP 6mt - 256k miles, z4m FCAB, stock. Drift car: 2001 330i for sale  |
|
Appreciate
0
|
| 12-03-2019, 08:45 AM | #125 | ||
|
Captain
581
Rep 673
Posts |
Quote:
Unfortunately the EGR Cooler wasn't the culprit, I did some additional diagnosis and ran the engine with the MAF removed, my best guess at this point is the whistle noise is coming from the EGR ports that are built into the turbo itself. If you remove the turbo inlet you can see multiple little square ports machined into the turbo housing right before the inducer. I won't be able to confirm until I go hybrids Quote:
__________________
N54 Powered M5 Wagon:
- M5 Shaft, M5 LSD, M5 Axles, M5 Brakes, M5 Front End, M5 skirts, M5 Mirrors - Manual Swap, MFactory SMFW, Spec Stg 3+, KW V3, RD Sport Sways, F14 SDC - EOS Port Injection Manifold, Fuel-It: Stg 2 LPFP +Lines +Ethanol Sensor - JB4, Hexon RR550s, Custom Inlet, AR DPs, 3" Exhaust, VRSF 7" IC, ER CP +Tial |
||
|
Appreciate
0
|
| 12-03-2019, 11:08 AM | #126 |
|
Captain
581
Rep 673
Posts |
The X5 has it's first road trip under it's belt (~700 miles round trip). Being deleted the X5 has the potential to be efficient but you really need to be mindful of your driving habits, for me >70mph the MPGs really start to deteriorate. I averaged 23MPG on the outbound trip which included getting over some mountains and also some spirited "demo" driving with relatives. On the return trip the first 80 miles were mainly rolling 2 lane road with light traffic and 55-65mph, this yielded 28.3 mpg and once back on the highway doing 75-80mph for the next ~300 miles including the mountains the gauge read 25mpg once I returned home.
I have some more tricks up my sleeve to optimize efficiency but it's pretty clear driving habits are the most important variable with fuel efficiency. I am interested to see what kind of mileage I can get with the beast but the reality is I rarely have the patience to drive that way, lol. I have another road trip for the holidays were I will do my best to see what ind of MPG I can achieve. On a side note, while running the Propel HPR fuel there is no visible smoke while driving even at WOT, awesome. In addition to no smoke the renewable fuel also has almost double the cetane of regular diesel, and the icing on top is the fuel reduces green house emissions by 40-80%, SICK! You gotta be in CA to indulge. I found a cheap E60 M5 cluster on eBay made a hybrid cluster. M5 gauges, X5 gauge faces, M5 needles, M5 bezel, X5 KOMBI. I was torn on the white vs red needles, I modded the cluster in my E61 and left the needles white as there is no arguing the superior daytime visibility. I prefer the svelt looks of the M5 needles so I figured I would give them a shot and see how I get along with the red. At this point the hybrid cluster is just an aesthetic mod but my goal is to get the radial engine oil temp gauge that surrounds the tachometer to work so I can know when my engine is up to temp before stomping on it.       With an upcoming multi-state trip for the holidays and 2 pups some extra cargo space is needed. I was eyeing up the Thule boxes but found a killer deal on a Yakima Skybox, not crazy about the styling but the dimensions and capacity were a good fit. I paired it with some Yakima Whispbars, this is my 3rd set and love the sleek profile. Happy with how it all turned out but the red really clashes with my color scheme. Pffffft. Box was functionally perfect after lubing the locks but it had a bunch of stucco and white paint marks on it from careless handling/storage but I polished the turd and made it a little more presentable.    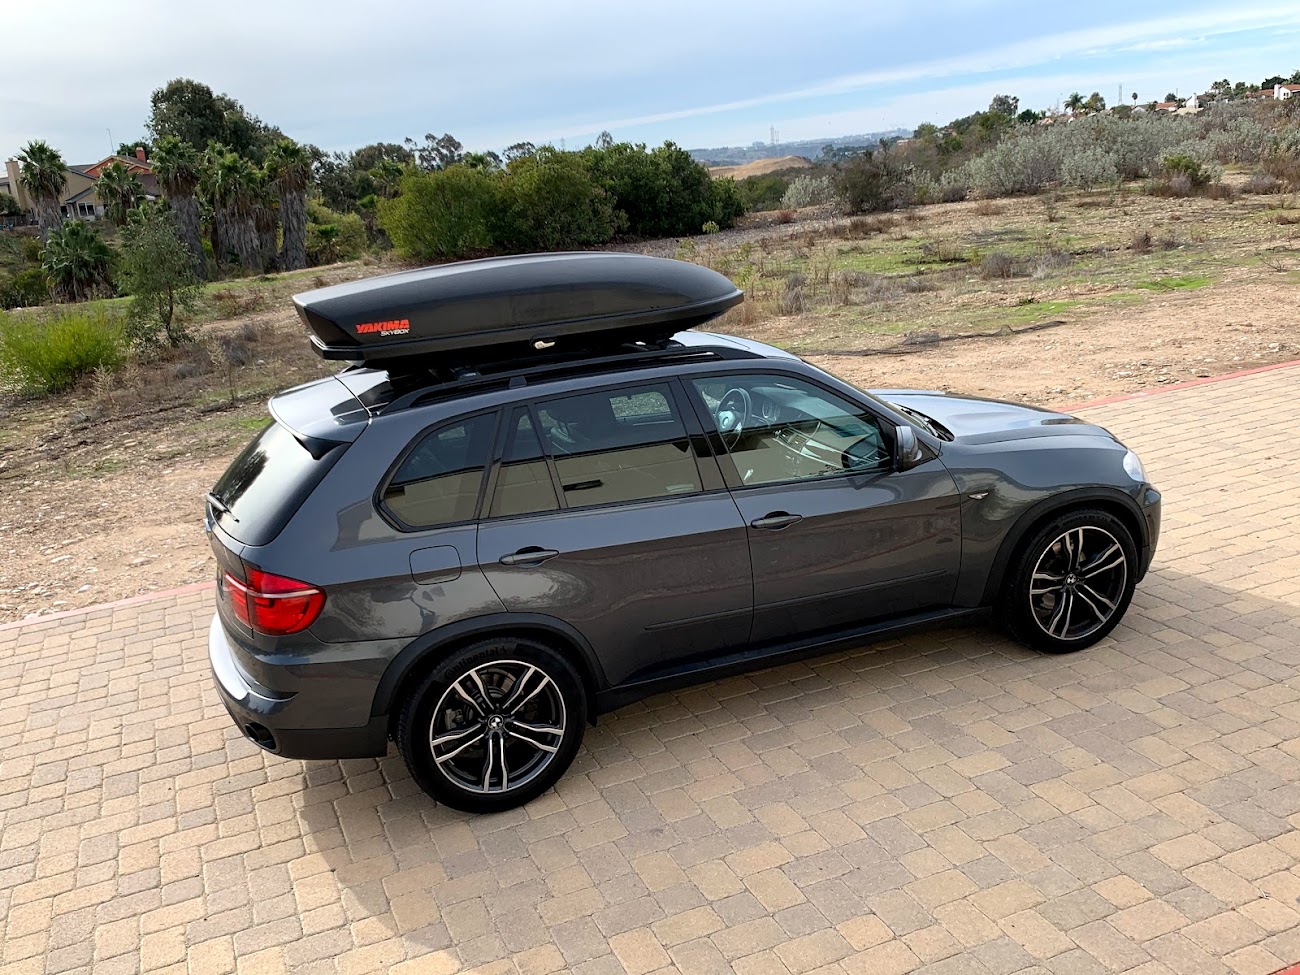   Worn front end sway bar links replaced with Meyle HD   Another chill upgrade. ATM stepped intachilla. I went with the optional ASV pipe so all the leaky OEM connectors from the turbo outlet to the intake manifold are replaced with quality silicone and clamp connections.       Clean as you go!  Can you tell which screw was close to the turbo outlet? lol  Adapters installed on turbo outlet and ASV  Stuffed in there. I will probably build a custom shroud that goes down to the bottom of the intercooler so airflow is optimized.  Everything reassembled, time to datalog and make sure I don't blow off any connections.  The last piece of the puzzle for the upcoming road trip is a winter wheel/tire setup. I have the OEM 19s that came on the X5 but 19s won't clear the eventual X5M brake upgrade and I don't want to reconfigure the winter set again down the road so I was on the hunt for some 20s. The OEM 20" X5 wheels are all heavy AF and during researching "5x120" on Craigslist I found a set of Camaro ZL1 wheels that caught my eye since they are concave and had a 10-spoke design that I would describe as more of a split 5 spoke. With more researching I found they have the same 20x10 20x11 widths as OEM X5 wheels and mangeable offsets at 23F and 43R. Bore is 67 so that will need to be machined out to 74.1 but no biggie. The kicker is they are FORGED and made by Alcoa, tipping the scales at 26lb F and 27lb R, light, really light! I decided to go with a square 20x11 setup for simplicity and found a killer deal on Michelin Aplin LA2 tires, 295/40/20. Got 4 new tires for a little more than the retail price for a single tire! My current 21" 612M wheels are forged but carry a bit more weight and the beefy Continental add more weight, especially the monstrous rear tire. My current setup tips the scale at 68lbs F and 80lbs R. The winter setup will be 61lbs per corner. I am eager to see how performance is impacted. If all goes well I might consider the ZL1 wheels for summer (all the time buy mountain trips) as well. Pic of the ZL1 wheels for reference, I think the styling will suit the X5 well. I had some concerns of putting sports car wheels on a performance truck but considering the quality of the wheel and the fact that the ZL1 isn't THAT much lighter than the X5 I think it should be fine, if my wheels breaks in half while driving then the jokes on me.   Cheap rubber at 1010Tires.com 
__________________
N54 Powered M5 Wagon:
- M5 Shaft, M5 LSD, M5 Axles, M5 Brakes, M5 Front End, M5 skirts, M5 Mirrors - Manual Swap, MFactory SMFW, Spec Stg 3+, KW V3, RD Sport Sways, F14 SDC - EOS Port Injection Manifold, Fuel-It: Stg 2 LPFP +Lines +Ethanol Sensor - JB4, Hexon RR550s, Custom Inlet, AR DPs, 3" Exhaust, VRSF 7" IC, ER CP +Tial |
|
Appreciate
0
|
| 12-03-2019, 11:58 AM | #127 | |
|
Captain
260
Rep 714
Posts |
Quote:
I suppose if I do a hardwire for the "with lights" and then do a whole relay harness for the hard "on" it would work.
__________________
Daily/ Tow: 2010 X5 35D - 326k, Deleted w/DUDMD Stage 2, Sutphin Trans tune, Comfort seat retrofit
Fun car: 2004 ZHP 6mt - 256k miles, z4m FCAB, stock. Drift car: 2001 330i for sale |
|
|
Appreciate
0
|
| 12-03-2019, 02:48 PM | #128 |
|
New Member
3
Rep 10
Posts |
I have a 2013 X5M and use 19 inch winter rims with blizzaks.
It's a square setup with 255 widths. Looks like a huge bodybuilder with skinny legs. But the 19's fit. If you get some sand in the rim though they will get caught in along the brake caliper and make nice grooves with a metal sheen all around the inside of the wheel! |
|
Appreciate
0
|
| 12-03-2019, 03:06 PM | #129 | |
|
Captain
581
Rep 673
Posts |
Quote:
__________________
N54 Powered M5 Wagon:
- M5 Shaft, M5 LSD, M5 Axles, M5 Brakes, M5 Front End, M5 skirts, M5 Mirrors - Manual Swap, MFactory SMFW, Spec Stg 3+, KW V3, RD Sport Sways, F14 SDC - EOS Port Injection Manifold, Fuel-It: Stg 2 LPFP +Lines +Ethanol Sensor - JB4, Hexon RR550s, Custom Inlet, AR DPs, 3" Exhaust, VRSF 7" IC, ER CP +Tial |
|
|
Appreciate
0
|
| 12-03-2019, 06:25 PM | #130 |
|
First Lieutenant
170
Rep 327
Posts |
Your neighbors must think you're some sort of crazy person being out in your garage this much considering most don't even wash their own cars these days
 . Great to know about that benefit of Propel, closest one to me is 1 1/2hr away unfortunately. Total bummer about the weird noises from the intake since you now have the support shroud cut. Perfect excuse to justify "needing" hybrids haha! Guess we know why BMW calls the stock one an "intake muffler" now. I wanted to copy your intake so bad. . Great to know about that benefit of Propel, closest one to me is 1 1/2hr away unfortunately. Total bummer about the weird noises from the intake since you now have the support shroud cut. Perfect excuse to justify "needing" hybrids haha! Guess we know why BMW calls the stock one an "intake muffler" now. I wanted to copy your intake so bad.The new rear tires look better now that the roof box is mounted, they looked a bit too beefy from the side profile. Is that a 335d in the next bay over  ? ?Look forward to seeing the next update! |
|
Appreciate
1
Pudgypepper27.00 |
| 12-04-2019, 10:16 AM | #131 | |
|
Captain
581
Rep 673
Posts |
Quote:
__________________
N54 Powered M5 Wagon:
- M5 Shaft, M5 LSD, M5 Axles, M5 Brakes, M5 Front End, M5 skirts, M5 Mirrors - Manual Swap, MFactory SMFW, Spec Stg 3+, KW V3, RD Sport Sways, F14 SDC - EOS Port Injection Manifold, Fuel-It: Stg 2 LPFP +Lines +Ethanol Sensor - JB4, Hexon RR550s, Custom Inlet, AR DPs, 3" Exhaust, VRSF 7" IC, ER CP +Tial |
|
|
Appreciate
0
|
Post Reply |
| Bookmarks |
|
|


