


|
|
|
| 11-10-2015, 09:08 PM | #45 |
|
Major
 209
Rep 1,044
Posts |
Haha thanks. Trust me I was celebrating after I finished the undercarriage detail. A lot of hours scrubbing.
Haven't had a lot of time lately but I'll be doing an update very soon. Just need to pickup some parts at BMW on Thursday. |
|
Appreciate
0
|
| 11-15-2015, 04:42 PM | #46 |
|
Major
209
Rep 1,044
Posts |
Well, I planned to do some modding over the weekend but decided to have Crevier BMW take it in to inspect a few things I noticed before I was about to detail the engine bay. Right now I'm rolling around in a 16' 535i M-Sport and I must say I don't mind if they take their time with my X. Once I confirm a few things with the details I'll fill you guys in with the details.
|
|
Appreciate
0
|
| 11-25-2015, 06:17 PM | #47 |
|
Major
209
Rep 1,044
Posts |
Well, the X5 is back home. Was about to detail the engine compartment but saw what appeared to be a small oil leak by the turbos. BMW found the issue and replaced turbo oil pressure lines under warranty. While they were in there they suggested replacing the vacuum lines but instead I ordered up the parts so I can do a DIY soon. Anyways, here are a few pics of things I'll be working on soon...
  |
|
Appreciate
0
|
| 11-27-2015, 04:50 PM | #48 |
|
Major
209
Rep 1,044
Posts |
Black Bumper Grills & IND Painted Front Reflectors
Yesterday was a long day of hiking (approx 3,900 ft to elevation for 10,064) and so today I had to keep the legs working to avoid them cramping up. Decided it was the perfect time to tackle what I've been wanting to get done for a while. Installation of the IND reflectors requires bumper removal and so does the front lower grill so it was a 2-for-1 deal. Overall a pretty straight forward job and no surprises. I put together a couple of videos for those who like to DIY so I'll probably get those uploaded in the next day or two. Anyways, who cares about all my yapping.......I know you guys really only care about the pics  Getting ready for bumper removal  About 15 minutes later...  Decided it was a good time for a detail as well as vacuuming up all the junk around the radiator and intercooler. I couldn't believe the size of some of the grass hoppers I got out of there.   Removing old silver grill and replacing with new black unit as well as cracking open the new painted front reflectors   Reinstalling after reflectors and grills were done. Some final shots    |
|
Appreciate
0
|
| 11-27-2015, 11:44 PM | #49 |
|
Brigadier General
 
2140
Rep 3,647
Posts |
So much better, I did the same iND painted reflectors. The rear reflectors don't bother me, but the front orange ones are not a good look.
I recall seeing a DIY for these on non M Sports where you didn't need to remove the bumper - the guy removed those lower corner grills and had access to the back of the reflector. Though, since removing the bumper didn't seem like much effort for you, it probably didn't make much difference. |
|
Appreciate
0
|
| 11-28-2015, 04:26 AM | #51 |
|
FDNY Engine 55
681
Rep 2,115
Posts |
Couldn't you just remove a few screws on the wheel well cover and sneak your hand inside to remove the reflectors? That's how I was able to do it without bumper removal...great job non the less and looks much better. I would like to see your DIY on removing the front bumper, there's lots of leaves and other junk stuck on the intercooler I can't get to
|
|
Appreciate
0
|
| 11-28-2015, 09:08 AM | #52 | |
|
Tanzanite Blue II X5M Pilot

1025
Rep 2,011
Posts
Drives: M3, M4, X3 M40i, X5M
Join Date: Nov 2011
Location: WS, GSO High Point, NC
|
Quote:
__________________
 2020 X5M - Tanzanite II 2012 M3 - Alpine White |
|
|
Appreciate
0
|
| 11-28-2015, 09:10 AM | #53 |
|
Major
209
Rep 1,044
Posts |
Unfortunately I don't think there's a way to do it like that with the DEF tank on the passenger side being right behind the bumper. You guys have to remember that it's not just a matter of removing the old reflector but also removal all of the leftover adhesive. I just don't see it being possible without bumper removal.
|
|
Appreciate
0
|
| 12-27-2015, 08:41 PM | #54 |
|
Major
209
Rep 1,044
Posts |
Vacuum Hose Replacement & Carbon Buildup Cleaning
Finally took the plunge and started tackling the replacement of my vacuum hoses after the dealer kindly offered to replace three for only $800! At that point I graciously declined and upon picking up the X5, I strolled over to the parts dept and ordered up all the parts I needed for less than $150. Fast forward to this weekend and I'm about half way through. Since I wanted to replace all the lines I pulled off the manifold to get access and at this point I've got all the lines replaced except for four. Now I'm just waiting for some extra "black" and "blue" vacuum lines to come in on Tuesday to finish the job. Of course as I started removing the manifold, throttle body and a few other parts, I decided it would be the perfect opportunity to do some carbon cleanup. Let me just say this is not fun at all. Eventually I decided to try using Acetone and that did the trick. Easily cut through the carbon and softened up the thicker areas with ease. After a couple hours of toothbrush cleaning, I had like new swirl flaps, EGR valve and throttle body ready to install. As for the manifold, I had some Acetone soaking on the inside for a little while and now I currently have it submerged in degreaser to help loosen everything up. Depending on the outcome tomorrow, I may or may not opt to have it sonic cleaned. Anyways, here's some photos to show some of the progress I've made: The original reason for tackling this job. BMW warranty apparently doesn't cover vacuum lines as they are "wear and tear" items.  Manifold removed  Ready to remove swirl flaps  Swirl flaps before/after     EGR & throttle body before/after      |
|
Appreciate
0
|
| 12-28-2015, 07:27 PM | #57 |
|
Major
209
Rep 1,044
Posts |
Intake Manifold Decarbonization
After 2 days of soaking and 3 hours of scrubbing and pressure washing, I've finally got the intake manifold near completely free of carbon deposits. All I have to say is thank god I'm done!!!!!!! This process was very laborious and needless to say I could really go for some hot tub time right now with an ice cold Peroni. Anyways, after all the mess, numerous rags and a contact high from an assortment of degreasers even through my painters mask, I couldn't be happier with the results. I just finished drying out the manifold and reinstalling the swirl flap assembly back into place. My new, repurposed acronym when working on the BMWs: TGIF - Thank God I'm Finished Onto what you guys really care about....       |
|
Appreciate
1
|
| 01-05-2016, 08:25 AM | #58 |
|
1mGator
144
Rep 567
Posts |
socale39 - what a great write up and thanks for sharing in such detail. Do happen to have a step by step process for removal and cleaning of EGR ... thanks!
|
|
Appreciate
0
|
| 01-05-2016, 10:12 PM | #59 |
|
Major
209
Rep 1,044
Posts |
Thanks for the kind words. As for the EGR removal it would be extremely difficult to do it without removing the intake manifold. If you had the time a patience I'm sure you could remove it keeping the intake installed however the bottom two bolts are going to give you the most grief. The other possible solution would be to remove the throttle body then the EGR but again, space is limited.
So far I have driven the 35d up the mountains and on the highway and as expected, no noticeable difference. Even then I'm very glad I went through the process just to have the piece of mind. Still looking into having the ports walnut blasted but we'll see. |
|
Appreciate
0
|
| 01-06-2016, 01:29 PM | #60 |
|
Slow M3 Driver
229
Rep 733
Posts |
Great job on keeping things clean, I wish I had enough time to do this my car...
__________________
 2014 Citrin Schwarz Metallic M5 2005 Interlagos Blau Metallic M3 |
|
Appreciate
0
|
| 01-06-2016, 08:52 PM | #61 |
|
Major
209
Rep 1,044
Posts |
Hey guys, just wanted to let you all know I replaced all the vacuum lines and the total cost using OEM BMW hoses wasn't too bad ~ $150. Its a little high for hoses but I wanted to stick with OEM and the colors designate location. Overall the vacuum job wasn't bad at all and I won't have to worry about possibly getting a vacuum leak for another 50-70k. I'd highly recommend tackling this job if you are handy as preventative maintenance.
Here are a couple pics showing the all new lines installed:    |
|
Appreciate
0
|
| 01-06-2016, 11:10 PM | #62 |
|
Brigadier General
2140
Rep 3,647
Posts |
Good work, good pics. I know you love the DIY stuff, but for an extra $650 and all that time (not the cleaning, but install) I would have had the dealer do the work and been done with it. But that's just me and I don't have the time or patience for this!
Awesome job  |
|
Appreciate
0
|
| 01-07-2016, 12:26 AM | #63 |
|
Major
209
Rep 1,044
Posts |
The dealer was charging $800 for only three lines. My guess is that they would have charged a lot more, maybe 2-3x, to replace them all. Not to mention I was able to clean everything up while I was in there.....something a dealer wouldn't have done.
|
|
Appreciate
0
|
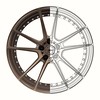
| 01-13-2016, 10:06 PM | #64 |
|
Major
209
Rep 1,044
Posts |
A sneak peek into an unexpected purchase I made last week. Need to get a few things lined up before getting them installed and frankly from there we'll see how they look. More details to come soon
 |
|
Appreciate
0
|
| 01-17-2016, 04:35 PM | #66 |
|
Major
209
Rep 1,044
Posts |
Rear Reflector Replacement with IND Painted Reflectors
Decided to tackle the rear reflectors today and I have to say both were a bit of a pain. Getting behind the bumper with my hands was a task and they just didn't want to come out. Even putting in the new reflectors required some effort with regards to force as they were a tight fit. These finished off the painted reflectors I now have all around and looks a bit cleaner not having the flow disrupted with red. Here's some pics as I got working on them. Unfortunately I forgot to take a before with both reflectors.    |
|
Appreciate
0
|
Post Reply |
| Bookmarks |
|
|


