|
|
|
 |
 |
|
||||||
Post Reply |
|
|
Thread Tools | Search this Thread |
| 01-27-2020, 09:45 PM | #1 |
|
New Member
13
Rep 26
Posts |
Going to do valve cover gasket and replace plugs and coils.....
Anything else anyone would recommend changing while Ive got the engines top hat off?
2013 35i. 72k miles. Runs pretty good, just leaks some oil. Just curious what others may have replaced while doing that job. |
| 01-28-2020, 06:41 AM | #2 |
|
Lieutenant
 
22
Rep 428
Posts |
I'm going to replace the valve cover gasket on a 2008 3.0 and I was wondering if you the guide tubes/valvetronic gasket were also necessary? FCP has a kit with these?
__________________
1997 /// M3 Coupe Arctic Silver CES STAGE IV (651rwhp/615rwtq)
1999 /// M3 Convertible Techno Violet |
|
Appreciate
0
|
| 01-28-2020, 09:36 PM | #3 |
|
Enlisted Member
 33
Rep 35
Posts |
I replaced spark plugs and coils for my 2011 x5 (3.5l) over a month ago. New parts installed:
- Plugs (Bosch) - Coils (Eldor) - Small Plastic hose attached to valve cover and passenger side intake tube. (It will break) I'm considering replacing the valve cover due to a small oil leak in the back of valve cover. Heat from turbo hardens the valve cover gasket. It's an additional expense, but the PVC is integrated withe valve cover. If it fails you'll doing the same job twice. Preventive work completed: - Oil filter and Oil cooler gasket - Coolant Tank - Drive Belt - All Pulleys |
|
Appreciate
0
|
| 01-29-2020, 05:57 AM | #4 | |
|
Lieutenant
22
Rep 428
Posts |
Quote:
__________________
1997 /// M3 Coupe Arctic Silver CES STAGE IV (651rwhp/615rwtq)
1999 /// M3 Convertible Techno Violet |
|
|
Appreciate
0
|
| 01-29-2020, 05:56 PM | #5 |
|
Enlisted Member
33
Rep 35
Posts |
The 5 inch hose is attached to passenger side of valve cover with the other end attached to some type of black intake tubing on passenger side. I can look up the part number. Hose will be brittle if original.
I didn't evaluate the eccentric shaft sensor. I'm not sure if this is a issue. Tackle the Oil filter before belt becomes oil soaked. This can cause catastrophic damage to motor if belt is ingested via crank shaft seal. BTW: Nice e36 high HP custom build. |
|
Appreciate
1
Skers 0577.50 |
| 01-29-2020, 06:00 PM | #6 |
|
Lieutenant
22
Rep 428
Posts |
Will do and thanks! I was fortunate to move to Fayetteville, NC for a short stint for work and they were close enough to make a trip to Monroe and John/Jimmy are good people that suckered me into their product!
__________________
1997 /// M3 Coupe Arctic Silver CES STAGE IV (651rwhp/615rwtq)
1999 /// M3 Convertible Techno Violet |
|
Appreciate
0
|
| 01-29-2020, 06:13 PM | #7 |
|
Enlisted Member
33
Rep 35
Posts |
BMW Maniac, I gave you wrong info. OP 2013 X5 (3.5L) is a N55 Motor.
Your 2008 X5 (3.0) should be a N52 motor. Your motor should be NA. The small hose I refer to as brittle isn't applicable for the N52. I'm familiar with the N52 as it was in my 2007 328I and 2008 X3. I did the eccentric shaft for my X3 for peace of mind. I didn't replace the valve cover, just the gasket. PVC is integrated in the valve cover. |
|
Appreciate
1
Skers 0577.50 |
| 01-30-2020, 04:45 PM | #8 |
|
Lieutenant
22
Rep 428
Posts |
Any suggestion for the CCV hose on the back that connects to the valve cover? I've read it breaks pretty easily
__________________
1997 /// M3 Coupe Arctic Silver CES STAGE IV (651rwhp/615rwtq)
1999 /// M3 Convertible Techno Violet |
|
Appreciate
0
|
| 01-30-2020, 08:18 PM | #9 | |
|
New Member
13
Rep 26
Posts |
Quote:
If that isnt possible, you can attempt to use a wide jawed pliers and bite on the tube at the fitting point, then attempt to slightly turn the entire tube a few degrees which can break free the bond enough to slide it off without tearing or cracking the line. Just a few things you can try. |
|
|
Appreciate
0
|
| 01-31-2020, 01:09 PM | #11 | |
|
Lieutenant
22
Rep 428
Posts |
Quote:
__________________
1997 /// M3 Coupe Arctic Silver CES STAGE IV (651rwhp/615rwtq)
1999 /// M3 Convertible Techno Violet |
|
|
Appreciate
0
|
| 02-01-2020, 02:57 PM | #12 |
|
Lieutenant
22
Rep 428
Posts |
So far, everything has been pretty straight forward. I do have a couple questions.
I removed the upper radiator hose. When I did it, the o-ring and this plastic ring was stuck onto the oil cooler? The o ring seems to have swelled up and doesn't fit inside the coolant hose. Is this broke? Or do I put the o ring in, then plastic ring, and all is well? You can see the oring/plastic ring in this pic. 2nd, the other radiator hose that had a plastic connector/looks like Mickey Mouse (2 x 10mm bolts attach it to the head) also left an oring in the head and that came out. Again, seems like it doesn't fit anymore. The new pipe that I am about to install has a smaller oring already on it. I assume give the styles, there is only 1 x oring that goes in there and not what would be two? One in the head and then one on the pipe? 3rd, If I do replace the upper radiator hose, I can't tell where the other hose connects? It looks like there is a connector between the radiator and under the overflow tank, but everything is covered in oil and I can't tell. See the pic of the upper radiator hose for reference...how does the other end connect?
__________________
1997 /// M3 Coupe Arctic Silver CES STAGE IV (651rwhp/615rwtq)
1999 /// M3 Convertible Techno Violet |
|
Appreciate
0
|
| 02-01-2020, 03:23 PM | #13 |
|
Lieutenant
22
Rep 428
Posts |
Also, I'm having a hell of a time removing the valve cover because of the two electrical conduits or wire harness....how do you remove them from the passenger side mount to get more room? Or is there another way to do it?
__________________
1997 /// M3 Coupe Arctic Silver CES STAGE IV (651rwhp/615rwtq)
1999 /// M3 Convertible Techno Violet |
|
Appreciate
0
|
| 02-01-2020, 10:52 PM | #14 |
|
Enlisted Member
33
Rep 35
Posts |
BMW Maniac, the black rubber o-ring fits in groove inside the hose. Use a little fresh anti-freeze as lubricant for the o-ring to connect the hoses.
Hoses with the clip only connects one way. Extend the "u" shape clip, connect hose in place and push U shape down to secure hose. The n52 motor passenger side electric connectors are the oxygen sensors, and coil connectors. Remove ground connectors "10" mm nut to move the wire loom out the way. |
|
Appreciate
0
|
| 02-02-2020, 05:15 AM | #15 | |
|
Lieutenant
22
Rep 428
Posts |
Quote:
Tracking on the "u" shaped clip I am talking about the two LARGE wiring harnesses that go across the motor and are somehow seated right below the cabin air filters. I've removed the injector/coil harness
__________________
1997 /// M3 Coupe Arctic Silver CES STAGE IV (651rwhp/615rwtq)
1999 /// M3 Convertible Techno Violet |
|
|
Appreciate
0
|
| 02-02-2020, 05:27 AM | #16 |
|
Lieutenant
22
Rep 428
Posts |
This is what I was asking.....If you look at the RealOEM picture, it shows the hose #7 and O-ring #8. If you see the new hose, it already has an O-ring attached to it. So, is this supposed to have 2 x orings in there? I would think not, but this is the first time I've dealt with this.
Also attached is the picture of the 4 x large wiring harnesses that seems to fit under some hold down bracket of sorts. None of the X5 replacement DIY or videos mention it, but it seems other N52 DIY say to move this out of the way for extra room, but they don't have the same hold down bracket....The 2 on top go over the valve cover and are the issue.
__________________
1997 /// M3 Coupe Arctic Silver CES STAGE IV (651rwhp/615rwtq)
1999 /// M3 Convertible Techno Violet |
|
Appreciate
0
|
| 02-02-2020, 01:36 PM | #17 |
|
Lieutenant
22
Rep 428
Posts |
Apparently the valve cover was crack already at one of the mounting points on the very corner. Guess the last person who replaced the gasket broke it off. One of the torx screws that holds one of the brackets for the beauty cover was missing too...hate half ass jobs.
__________________
1997 /// M3 Coupe Arctic Silver CES STAGE IV (651rwhp/615rwtq)
1999 /// M3 Convertible Techno Violet |
|
Appreciate
0
|
| 02-07-2020, 08:34 PM | #18 | |
|
New Member
13
Rep 26
Posts |
Quote:
|
|
|
Appreciate
0
|
| 02-07-2020, 08:47 PM | #19 |
|
New Member
13
Rep 26
Posts |
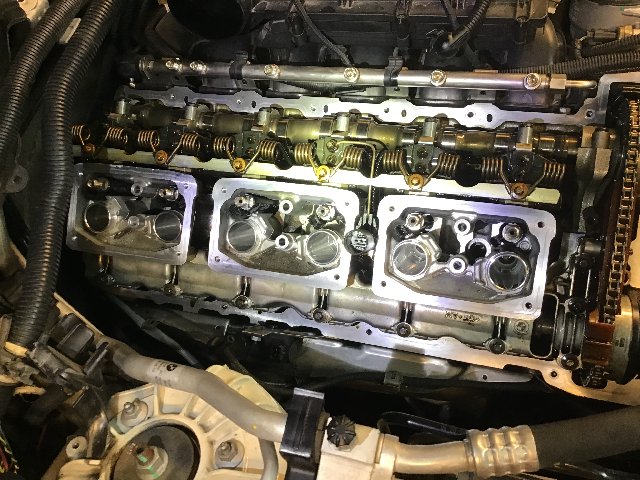
Update: Job took me 4.5 hours. Though I was admittedly going slow as to not break any brittle plastic. Could have done it in 3-3.5. And it solved the leak onto the manifold causing the smoke and burnt oil smell at idle.
Tips for others doing the job- replace the coils and plugs at same time. Replace valve cover if you can afford it, though not necessary. The brittle tube from the valve to the intake tube will break if not very careful. Use a few spare washers on the valve cover side of that fitting place in the of the 4 slide clips to allow you to pull the last clip up and slide it off the valve cover. If the replacement gasket is not staying in the groove of the new valve cover, use a small amount of high high temp RTV silicone to hold it in place while maneuvering the cover back in. I also used some High temp professional RTV silicone on the back end and spread a very minor amount on the block surface mounting area. I took my finger and spread a coating along the back end and around the valve cover mounting surface all around. This should help prevent future leaks when the gasket becomes more brittle with heat. Also I used some abrasive pads to clean the mount surface very very clean and smooth all around. Lastly, most of the bolts are torx T20/25 and a few TorxNegative T10. I would carefully notate where each bolt/torx screw comes out of as they are easily “interchangeable” but truthfully they aren’t. The lengths vary on some of them as do diameters. Also, inspect the top end. If the valves and cams have any sludge or look darker than an amber brown / gold tint, you may have issues. https://i.postimg.cc/MXkNP1zy/295511...D168359-DD.jpg |
|
Appreciate
0
|
| 02-08-2020, 06:10 AM | #21 | |
|
Lieutenant
22
Rep 428
Posts |
Quote:
I get to reinstall this weekend, looking forward to finishing this up! Did you use brake cleaner and a scotch brite pad to clean the surface? I was using one for the oil filter/oil cooler surfaces for those gaskets, so I figured it would work here too
__________________
1997 /// M3 Coupe Arctic Silver CES STAGE IV (651rwhp/615rwtq)
1999 /// M3 Convertible Techno Violet |
|
|
Appreciate
0
|
| 02-14-2020, 12:02 AM | #22 | |
|
New Member
13
Rep 26
Posts |
Quote:
|
|
|
Appreciate
0
|
Post Reply |
| Bookmarks |
| Tags |
| coils, plugs, valve cover |
|
|