As I wrote these instructions it became evident that there are way too many words, however your patience will be rewarded if this interests you at all. This is not a difficult DIY, but it can be tedious. Once you read the entire DIY I think youll realize the actual work part isnt bad and theres just a lot of info to communicate to help you avoid pitfalls and/or find an easier path. It took some trial and error to find a good path to final install. I have no doubt that you will find better ways to do some of this work, so please share if you can improve on whats presented.
This is purely an aesthetic upgrade IMO. There is NO improvement over existing OEM hardware to be gained. If youve been following this thread, you know I have spent time wrapping the shift knob trim in black or carbon fiber vinyl. Vinyl wrapping looks decent but the edges peel over time and wrapping around the trim edge results in fitment issues. About a year and a half ago I found one poster in the classified selling his E70 who had replaced his E70 shift knob with a DCT shift knob, but after asking he claimed hed post info but didnt. Then recently I found another poster in the classifieds who was selling his E70 and he had an F-series shifter installed. He was happy to share the one critical detail needed to identify the applicable gear selectors in an ocean of bmw gear selector options. So HUGE thanks to
dlucas589 for his effort and expense with trial and error to find the key to selecting the right gear selector for our E70s.
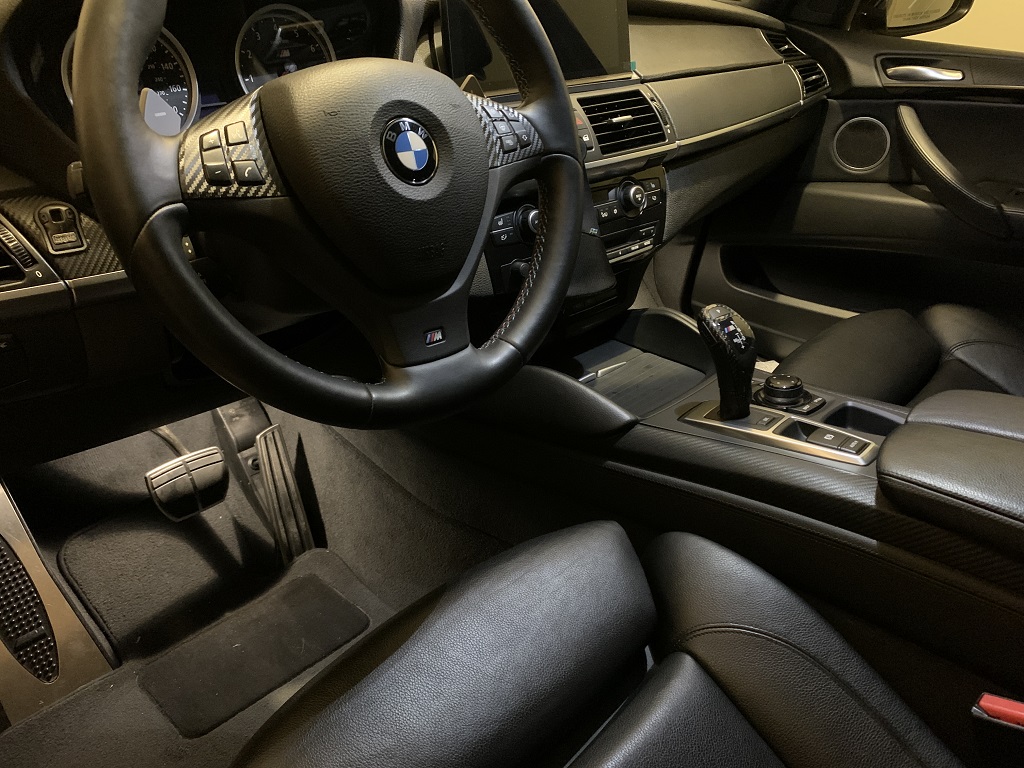
Final install of Carbon Fiber F-Series Shift Knob into E70 X5M:
 SUMMARY:
-Purchase a used F06, F12, or F13 Gear Selector with appropriate shifter ribbon cable.
-Remove F-Series shift knob components from gear selector. Clean components and thoroughly condition leather boot.
-Modify leather boot plastic stem and trim away excess leather.
-Remove E70 gear selector from vehicle (negative battery cable disconnected prior)
-Remove E70 Shift knob and components from E70 gear selector.
-[Optional] Wrap E70 EDC trim in matte black (or preferred color) vinyl wrap of your choice.
-Cut leather boot plastic stem to size
-Install F-Series shift knob and leather boot onto E70 gear selector, reassemble trim components, and install back into vehicle.
INSTALLATION NOTES:
-Once this MOD is installed, it is completely reversible and you can restore your E70 OEM shift knob at any time, without removal of the entire gear selector from the vehicle.
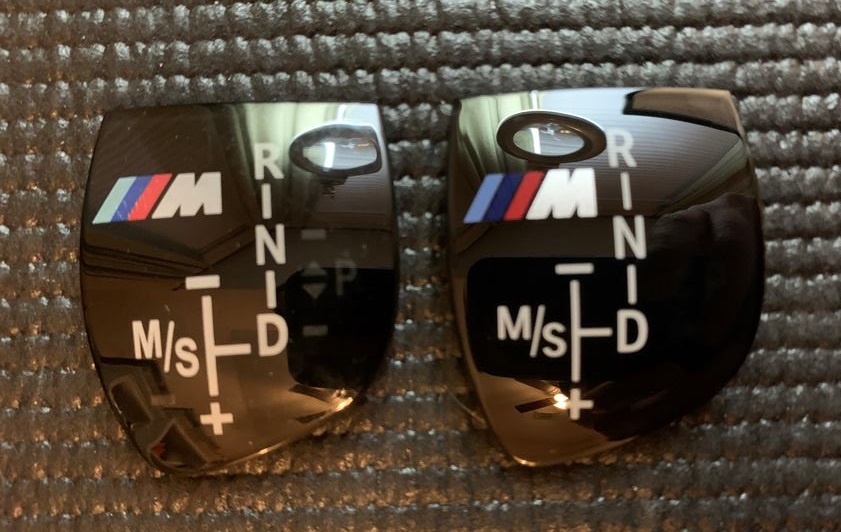
-Unless you purchase the expensive OEM Carbon Fiber Shifter Trim (61-31-2-250-703) you may not have the m-logo on the RND glass display. The glass display is also compatible with aluminum and ceramic shifter trims. This kit requires use of a T9 torx driver for installation. There is a third party selling R-N-D displays with M-logo on eBay (search bmw console gear stick selector). I ordered one and they are pretty close to OEM, maybe ~90%. The m-logo is slightly smaller and if you zoom in there are some micro-cracks visible on the surface. In the image below, the OEM version is on the right.
-The existing E70 gear selector ribbon cable is compatible with the F-Series shift knob.
-Unless you damage the ribbon cable upon disassembly, no major gear selector disassembly is required.
-Due to the subjective nature of portions of this mod, it is required that you read instructions entirely prior to proceeding with the DIY.
-There is a handy link below that details how to disassemble and repair gear selectors.
TOOLS RECOMMENDED:
Torx Driver T8, T9, T20
Torx Socket/Wrench T25, T30
Nylon Pry Tools
Hacksaw or equivalent
Sharp Scissors
Heat Gun
Sandpaper, Fine
Clamp, C-Type
Silver Marker (to mark leather if needed)
PURCHASE GEAR SELECTOR:
-DISCLAIMER: Trial and error was required to find the appropriate gear selector, but by no means is every gear selector configuration understood. Please know there is some risk involved in purchasing a gear selector. However, I reduced this risk by selecting a 6-series gear selector that I knew was successfully being used by Dlucas589 in his E70. The gear selector I chose was from a 2012 F12 650i, P/N: 61-31-9-251-191 and is compatible. If you find other models that work, please post. Theoretically one could buy a brand new gear selector (~$900), however most of the applicable gear selectors have been superseded by gear selectors with new part numbers and its uncertain to know if youll get the one with the correct feature upon order.
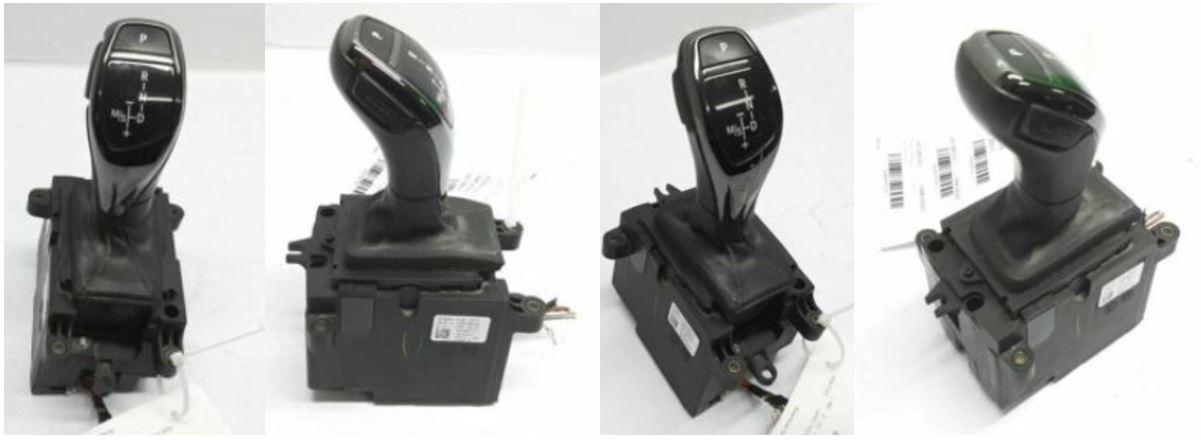
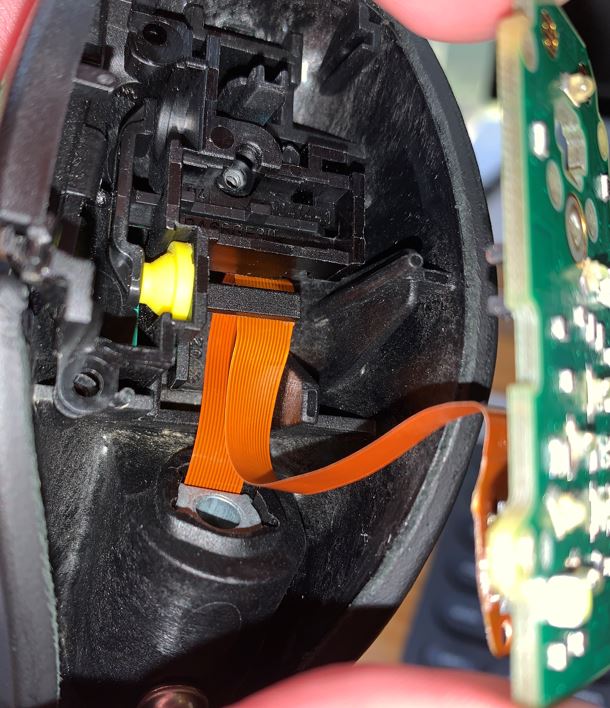
-When you remove your E70 shift knob circuit board youll see a ribbon cable with a unique-looking connector. The goal is to find an F-Series shift knob whose internal circuit board uses the same ribbon cable/connector as that found in our E70 gear selector. Below is an image of the F-Series ribbon cable and circuit board. The connector and ribbon cable look the same in the E70.

-Many gear selectors look identical, but the internals vary. The correct gear selector has the little door located as shown in the image below. The E70 gear selector has the same door feature. There is a ribbon cable that goes from the circuit board in the shift knob to a circuit board located behind that plastic door. If the F-Series gear selector has this door, then it is very likely that it also has a similar ribbon cable and connector as the E70.

-You do not need to swap ribbon cables. However, the E70 ribbon cable is much longer and you will have to creatively fold the ribbon cable carefully such as to avoid creasing it. Keep the F-series gear selector ribbon cable as a spare. Also, take caution when removing the shift knob. If you pull up with a lot force, upon disengagement, the connector could catch on the shift knob resulting in damage or breakage of the ribbon cable. At which point youll need to disassemble the F-series gear selector and the E-series gear selector to swap ribbon cables. Below I explain how I removed the shift knob with little force required to avoid damage.
-Youll want to find a gear selector with a shift knob and boot that are best condition possible. This is not so easy as the images provided on ebay dont provide the necessary detail. For instance, the one I selected looked to be in excellent condition based on the pix, however upon arrival it was a little less so. The knob itself had a few hard-to-see scuffs, general wear, and the leather needed conditioning.
-If you want a shift knob with ceramic trim you will want to buy a gear selector with this trim already included. Buying separately could get pricey unless you find a rare deal. You can get an applicable F06, F12, F13 gear selector for as little as $150USD with aluminum shift knob trim. Expect to pay more for cleaner, better quality shift knobs. There are third party CF trim layovers and replacements for reasonable prices (IE: AutoTechnic). There is an OEM CF trim replacement (P/N: 61-31-2-250-703) for an unreasonable $250. However, the RND m-logo glass and park button are compatible with any trim (aluminum, ceramic, carbon fiber). Unfortunately, without purchasing the CF trim you wont have an m-logo on the new shifter. The actual important part is the shift knob shell b/c at the year models were looking at they can easily be beat up.
-Pay attention not to buy the wrong drive-side gear selector, LHD v. RHD, both types are out there on eBay.
DISCUSSION - OTHER BMW MODEL GEAR SELECTORS:
-[UPDATE] I purchased a newer 6-series gear selector w/o the door just to see what was compatible. Many parts were compatible, but the shift knob shell and circuit board connector cable were not directly compatible. The shift knob shell is compatible to an extent, but the thru hole for the fastener does not line up to the gear selector metal shaft threaded hole. You could drill your own thru-hole potentially. The circuit board in these model gear selectors uses a bundled cable, not a ribbon cable, with different connector.
- There are three types of F-Series gear selectors that I know: the shift knob style installed in this DIY, the shift knob that looks very similar to the E-Series shift knob, and DCT shift knob
-As I mentioned above at least one E70 poster was able to install a DCT version, but I have no information other than whats posted herein.
-I strongly considered the E-style looking F-Series Shift Knob because there are carbon fiber cover options (OEM and aftermarket) available. However, the oem CF version seemed to be harder to find and more expensive. Despite looking a lot like the E-Series shift knob, they are different. Without actually doing it, I believe it too can be installed if preferred and probably a bit easier since there is no leather boot to accommodate.
-These links were invaluable when doing research, so big thanks to M.Ovidiu on youtube. The first link is Gear Selector Repair and the second link shows the Differences Between F-Series and E-Series Shift Knobs:
https://www.youtube.com/watch?app=desktop&v=kr9ol8cGZIw
https://www.youtube.com/watch?app=desktop&v=76jfjqFVJYY
-I discovered an OEM dry carbon fiber F-Series shift knob trim (61-31-2-250-698) that I thought would go very nicely with the leather carbon trim option in the E70 X5M. However, according to realoem, the part number doesnt match the shift knob in the F06/F12/F13 series. They are VERY similar, but I dont think they are compatible. It appears from images that the dry CF shift trim has an internal feature that is slightly different and possibly the overall proportions are different. I stopped there as I didnt want to spend time and effort on it. However, it turns out this trim is compatible with some F25 (X3) and F26 (X4) gear selectors. I also found that some of the F25/F26 gear selector have the small door. However, I only had budget for one gear selector and stuck to the low-risk route of the 6-series gear selector.
- Youll also find that some F10 5-Series gear selectors have gear selectors with the small door. I have no idea if they are compatible, but they pass the first test by having the small door.
- There are likely other models that are possibly applicable. Please post if anyone tries other variations of gear selectors that work.
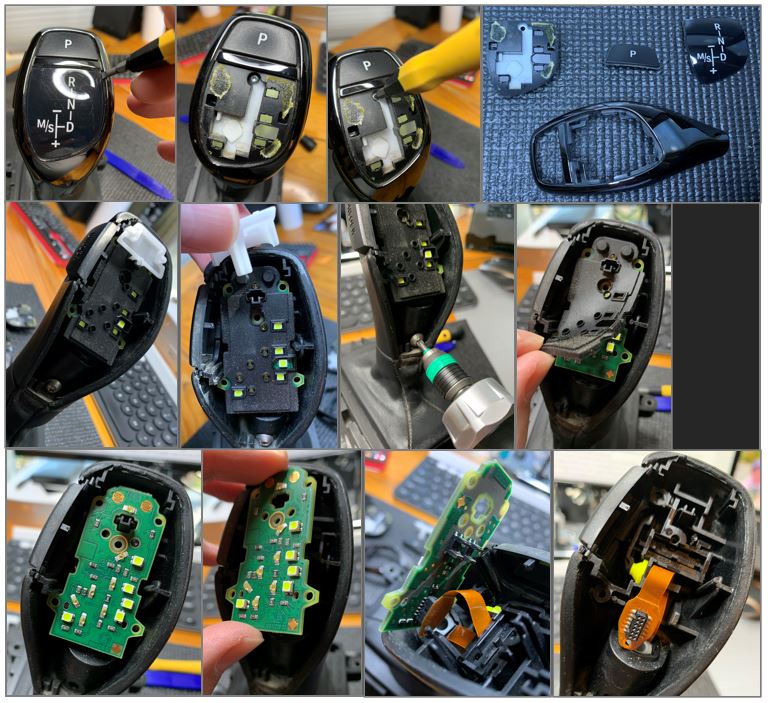
REMOVE F-SERIES SHIFT KNOB:
- At upper left corner of R-N-D glass pry upwards to remove. It is only held in place by adhesive/friction.
-Remove single T8 bolt.
-Remove black LED diffuser block from shift knob.
-Pull off Aluminum/Ceramic/CF shift knob trim and P-button.
-Pull up and remove white part under P-button.
-Lift off rubber circuit board cover.
-Pull up and remove UNLOCK button assembly. Note that there is only one neon yellow damper puck.
-Gently lift up circuit board, but only lift as far up as needed to access the ribbon cable connector on back of circuit board.
-Using your fingers, disconnect ribbon cable connector from circuit board.
-Thoroughly clean all components.
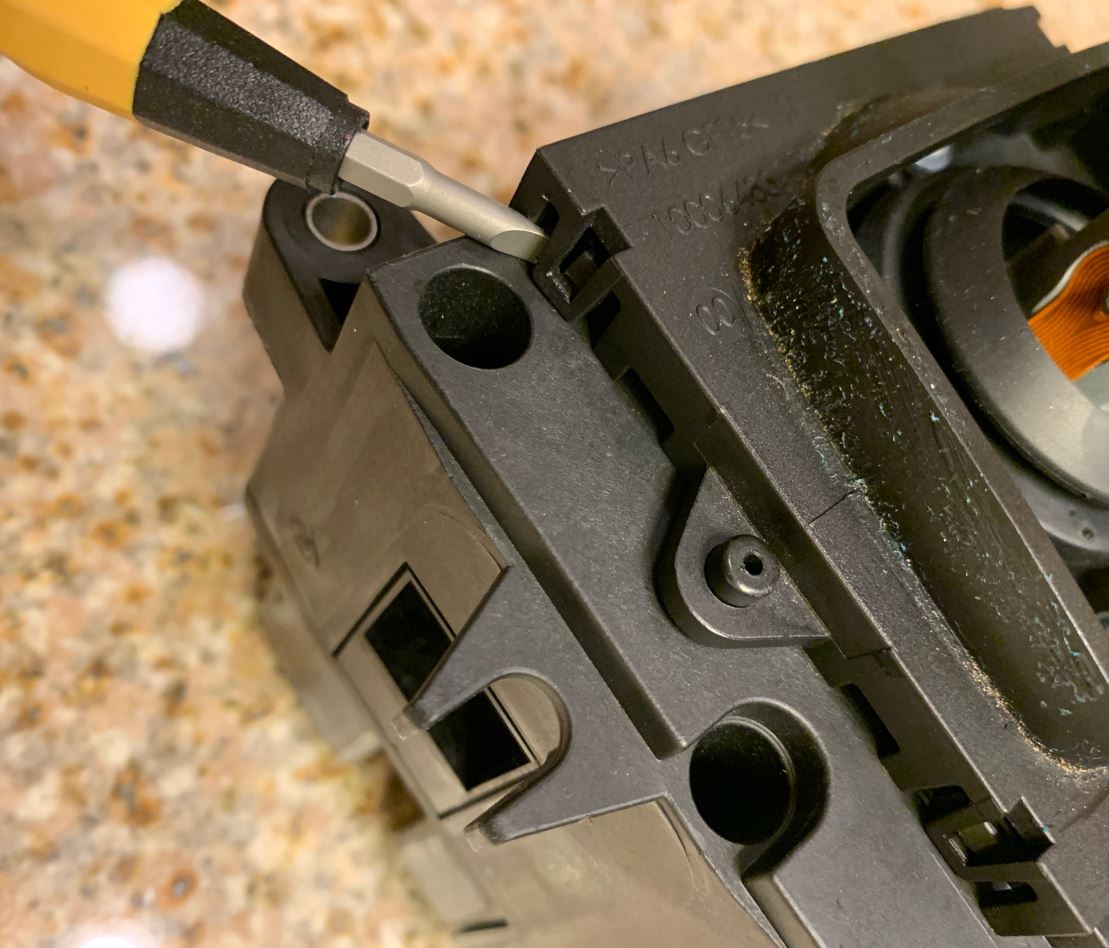
- Remove single T20 Screw fixing the shift knob shell to gear selector metal shaft.
- Remove Shift Knob Shell - **CAUTION! Risk of burn and/or injury!** This step only explains how I used a heat gun to remove the shift knob shell and is not intended as instruction. *Reference Only*
-My first step was to try removing the shift knob without using a heat gun. -I did not grab the shift knob and just pull up with excessive force as this would have likely caught on the ribbon cable connector and caused irreparable damage. However, after applying as much force with my thumbs as I could, it didnt budge. Then I decided to use the heat gun.
- I held the shift knob with my left hand placed my thumb over the ribbon cable at the base where it comes out with the metal shaft, as to protect the cable.
-Using a heat gun on a medium-low setting [FWIW - my heat gun has a switch for high and low settings and an adjustable dial from (-) to (+). I used low switch setting with dial turned to ¾ max], I applied heat to the area where the metal shaft and plastic shift knob interface. This is an area below my thumb position. The area I concentrated was where the single T20 screw was removed. If my thumb got hot, I knew the ribbon cable was getting heated as well. I would then move the heat gun away to ensure I did not melt or damage the ribbon cable. I heated the area for less than 10 seconds.
-Holding the gear selector against my body, I positioned my hands so that I could use both of my thumbs to press against the lower shift knob away from the gear selector. This method was intended to ensure that the shift knob only moved the length of my thumb displacement. However, you can also send it flying. SO, I positioned the shift knob an inch from a wall to ensure it did not shoot off (and damage ribbon cable) from the pressure I applied. It came off much easier than expected and required only medium to low force with my thumbs.
- Remove shift knob being careful to thread ribbon cable through shift knob thru-hole.
- Once the shift knob is removed the first time, it gets easier and easier to remove requiring little effort.
PREPARE F-SERIES LEATHER BOOT:
- On F-Series gear selector, pry four (4) tabs around rectangular leather boot surround trim and separate boot assembly from gear selector. [Image shown with leather boot already removed from trim]
- Detach glued leather from F-series gear selector trim frame. It is lightly glued to surface so use a flat nylon pry tool to start removal, then use fingers to lift all around for remainder.
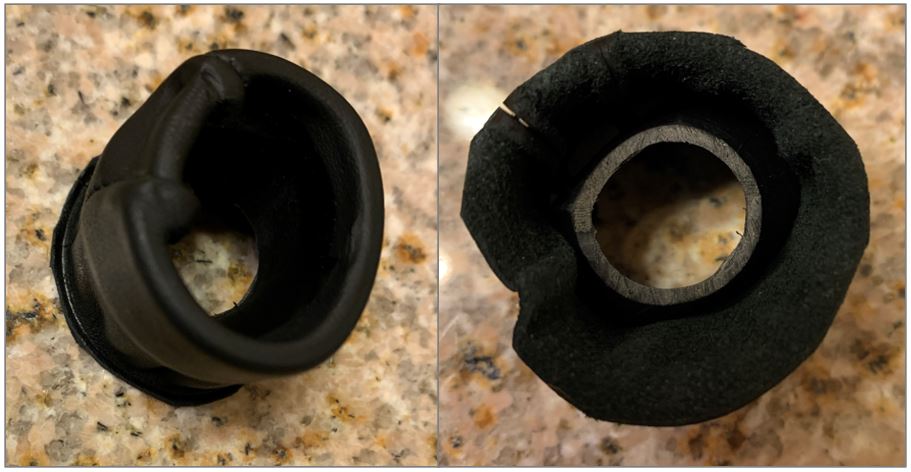
-[UPDATE] Underneath the leather boot is a plastic stem piece that has a dome-featured disk. Cut the disk off at its base, so that the longest possible plastic stem remains. I used a hacksaw the first time, this is not a good solution for fine cut. The second time I bought a Suizan 5 Japanese Style Pull Saw for fine cuts. Firsts off, this tool is amazing, it only took me 4 or 5 pulls. Its only 0.010 thick with the kerf being a bit more. You may do better, but even by hand going slowly I couldnt get an exactly perpendicular cut to the stem centerline, but I was very close and it was a MUCH better result than with the hacksaw (see chewed hacksaw cut in image below, further below is the pull saw cut).

-The leather boot had minor water stains and it can be sometimes hard to capture in pictures. See before image below, the white areas are stains not reflection. Condition leather as needed with Leatherique or equivalent. I cant recommend Leatherique enough for this step. It is a serious conditioner and works really well on this particular piece of leather. I applied Leatherique rejuvenator on the top and back of the leather and let it sit a couple days wrapped in Saran Wrap. Then I used pristine clean to remove the rejuvenator which by this point had pushed all the dirt to the surface.
 E70 GEAR SELECTOR REMOVAL:
- While the leather conditioner sits, its time to remove the E70 shifter assembly from the vehicle.
- Disconnect the negative battery cable.
- Starting at the front left corner of the shifter surround trim, pry up the corner using a pry tool until you hear the clip disengage. Continue around the trim piece prying up clips. These clips are particularly sturdy and it requires some good effort to unclip. Be careful not to damage your interior trim when prying
place some cardboard between the pry tool and the trim.
- Use a T30 socket and drive to remove the four long screws at the corners.

- Lift the gear selector up and disconnect the e-brake and gear selector connectors.
- Using a T-20 driver to remove four screws and lift off the aluminum trim piece that holds the e-brake module.
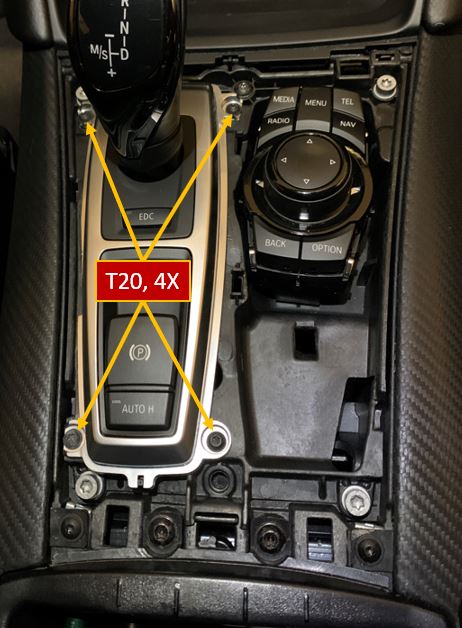
-The assembly that is left is actually made of two pieces, one is the gear selector and the other is a frame. Remove the three (3) T25 screws to separate the frame from the gear selector. One screw is front center and the other two are rear left, down in a pocket. Without this step you wont be able to remove the EDC trim.

- From the EDC button you can follow a cable to underneath the gear selector. Disconnect this cable so that the EDC Trim can be full separated from the gear selector upon removal.
- Using a T-20 Driver, remove the three (3) screws that mount the EDC Trim to gear selector.

-Consider wrapping the E70 EDC trim piece in 3M 2080 M22 Matte Deep Black vinyl wrap or a color of your preference. Ive been running mine in matte black for a while b/c it just seemed to break up the bright aluminum in the center console. I recommend doing so in black because it wont immediately draw your eye to the leather boot stuffed in the EDC trim, FWIW.

- Installation of E70 gear selector is reverse of removal.
PROPERLY SIZE F-SERIES LEATHER BOOT FOR INSTALL:
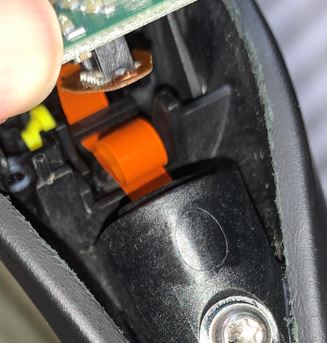
-[UPDATE] This is a critical step to ensuring the boot sit properly. When you disassemble the shift knob from the F-Series gear selector youll find the leather boot assembly is held in place by friction to the bottom of the shift knob. Actually, its a clamping force between the shift knob shell and the boot stem bottoming out on the gear selector.
-[UPDATE] For this DIY, we need to mimic this clamped assembly so that the leather boot doesnt sag, wobble, or sit misaligned with shift knob shell. This is accomplished by properly cut the remaining plastic stem (without disk feature) to a length that will allow it to fit snug between the installed shift knob shell and gear selector.
-[UPDATE] Next, we cut the plastic stem to proper length. If you leave the plastic stem too long, then the shift knob shell does not fully seat. If you leave the plastic stem too short then a gap between the shift knob and leather boot results.
-Note that the F-Series shift knob is fully seated on the gear selector metal shaft when the T-20 bolt thru hole on the shift knob aligns with the thread hole on the metal shaft.
-Assuming you cut the stem disk at precisely the base, then you need to remove no more than 0.300 from the remaining plastic stem. If cutting by hand youll likely need to assume you wont make a perfect cut and consider the tolerance. I marked 0.300 and my cut ended up being as much as 0.315 and as little as 0.285. This worked sufficiently, however I recommend to cut a bit less and iteratively use sandpaper as needed to shorten the stem further. Also, do the math if you didnt cut the disk precisely at the base
-At all cost, avoid cutting the stem too short
-The glued F-Series boot and shift knob are now ready for FINAL ASSEMBLY.

 TRIMMING BOOT LEATHER TO FLOAT:
-[UPDATE] The objective in this step is to cut away excess boot leather. There are two methods and the preferred one depends on your craftiness
NOTE: These steps assume the plastic stem in the leather boot is cut to the appropriate length
NOTE: Cutting too much of the leather boot results in the leather edges being easily seen or pop out of the EDC trim thru-hole
NOTE: Cutting too little of the leather boot can result in the leather folding and preventing the EDC trim from being properly bolted down in place.
-Stuff the leather from the leather boot into the EDC trim and loosely position the EDC trim and boot into its place on the E70 gear selector.
-Fully install the F-Series shift knob onto E70 gear selector metal shaft. If it does not fully seat then likely the boot plastic stem has not yet been cut down or is too long.
-Ensure the boot is properly oriented with respect to shift knob.
-Pull leather slack through EDC trim such that leather just under shift knob looks relaxed.
-Bolt EDC trim in place. If youre having trouble getting the EDC trim to seat you may need to trim some leather or ensure the leather isnt folded. Note, only tighten the EDC trim bolts, do not torque down fully. This step serves only to clamp the leather in place so that a clamping mark remains, thus providing some reference of where to cut excess leather. Let sit a few hours.

-After some time, remove the shift knob. Unfasten the EDC trim and separate the leather boot from the EDC trim piece and gear selector. You will see a compressed ring mark on the leather where it was clamped in place
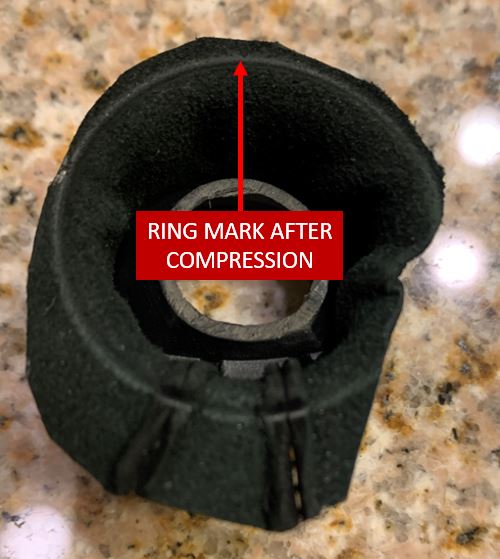
-[UPDATE] OPTION 1 - Using sharp scissors, cut along the outside of the ring to remove excess leather. Maybe an 1/8-1/4 outside the ring is sufficient, but you may need to do some iteration to check for yourself. This method, with careful installation, should prevent you from clamping the leather when bolting the EDC trim. It will effectively float in the space and allow the shift knob to operate normally. If you cut too much off at this point, you may have the cut edges showing or work themselves out of the EDC trim hole, see image below.
-[UPDATE] OPTION 2 Another option is to remain conservative and leave plenty of leather. In this case you can expect the leather to be clamped by the EDC trim piece upon installation. Assuming there are no folds in the leather this can be done successfully. HOWEVER, you have to iterate to figure out how much leather slack to leave prior to bolting the EDC trim in place. If you clamp the leather such that it is in tension against the shift knob, then the shift knob will be fighting against the tension during normal operation, limiting its motion and not working properly. One good thing about clamping is that you dont have to worry about the stitching ever unraveling, as is possible once you cut the seams.
-Install the boot after the EDC trim is bolted in place.
 FINAL ASSEMBLY:
-From here it goes quickly, you already did the hard part.
-Install the EDC Trim to the E70 gear selector loosely.
-Route the EDC button connector down the side of the gear selector and mate the connector.
-Install the gear selector assembly back onto the frame using the three (3) T25 bolts.
-Install the glued F-Series shift knob and boot onto the E70 Gear Selector metal shaft.
-Fasten shift knob to shaft with the single T20 bolt.
-Push the boot leather into the EDC Trim thru-hole and mount the EDC trim using the three T20 bolts.

-Install the four (4) T-20 bolts to secure the aluminum shifter surround trim.
-On the shift knob, install the UNLOCK button assembly carefully routing around ribbon cable.
-Connect ribbon cable to circuit board noting that the connector is keyed.
-[UPDATE] Simultaneously position circuit board and ensure ribbon cable is folded and not creased. The excess length of the ribbon cable should sit double folded and require a bit of attention to get right. The image below shows the first step, pushing the folded ribbon under the black plastic tab. Next, hook the second fold (near the connector) around the plastic tab and position circuit board in place. The end result is that three layers of the ribbon cable sit under the plastic tab and the connector end comes out above the black plastic tab.
-Install rubber cover over circuit board.
-Install white part under P-Button
-Install P-button on shift knob trim cover. Consider using blue painters tape to hold P-button upon install of shift knob trim cover.
-Install shift knob trim cover onto shift knob.
-Install black LED diffuser block into trim cover.
-Fasten T-6 screw.
-Install RND top cover. Apply adhesive if needed.
-Install E70 gear selector back into vehicle in reverse order of disassembly.

 [UPDATE: 6/3/2022] FINAL BOOT ADJUSTMENT
- This section is for REFERENCE ONLY and describes only what method I used to make final boot adjustments.
- Upon final installation the gear selector worked fully, however I could feel a bit of resistance in the gear selector compared to its previous function. This was due to the tension in the leather boot. To clean this up I partially loosened the EDC Trim bolts (which are effectively clamping the leather boot) and actuated the shifter knob in all directions (creating a bit more slack in the boot) until the gear selector movement felt smooth.
- I started by removing the top black Plastic Trim with a pry tool, but I did not disconnect the idrive from the connector. I removed the idrive from the plastic trim with idrive still connected. This is because I preferred to actuate the gear selector with vehicle ON and I didnt want any errors with idrive disconnected.
- I next removed the aluminum gear selector frame via four (4) T20 bolts and set aside.
The next part was iterative:
-I slightly loosened the three (3) T20 bolts of the EDC Trim. Loosening too little and the adjustment wont work b/c the leather boot remains clamped. Loosening too much will quickly add a lot of extra slack in the leather boot creating a puffy leather balloon under the gear selector.
- CAUTION I next turned the car ON and pressed the AUTO H button (green light appears in the instrument cluster). This ensures I dont get distracted and relieve my foot thus causing the vehicle to move. With foot remaining on the brake pedal I actuated the gear selector into its various positions.
- At first this didnt work because the EDC Trim bolts were too tight.
- I repeated the previous two steps starting with once again slightly loosening the EDC trim bolts. I repeated this procedure until the gear selector movements were smooth.
-END.