REFERENCE POST #144 ABOVE for my exact Android Monitor Model and Purchase Options, as well as pre-purchase Q&A from the Vendor:
Some things to consider when installing the Android Monitor:
1. Prior to disconnecting the battery, move the passenger seat (or seat you plan to use for install) to a far forward comfortable position to keep you from having to lean forward as much. Also open glovebox. You may want to take this time to make sure you AUX IN is working correctly, so if it's not after install you have a data point.
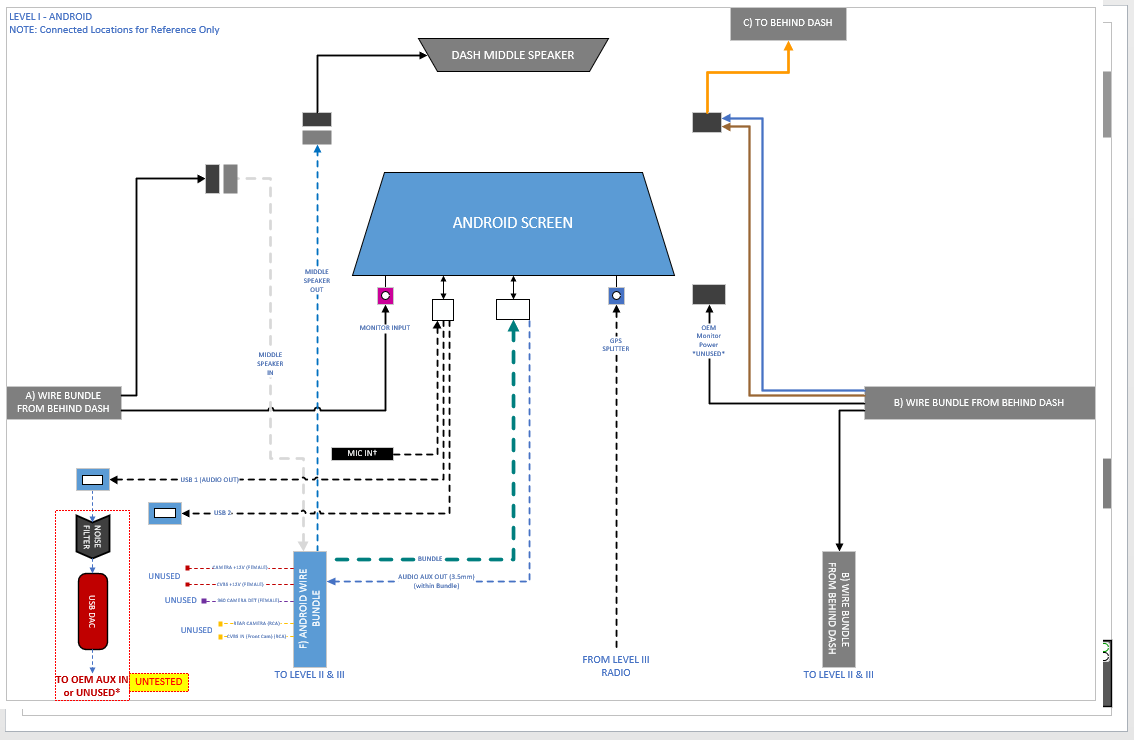
2. The Android monitor needs GPS and the factory radio needs GPS (if vehicle equipped with factory NAV). IF your vehicle has the factory navigation option you can use the GPS splitter to split the radio GPS to the monitor **OR** leave GPS to the radio and install the provided GPS module (LVSD connection on back of monitor) somewhere in your dash near the windshield. If you don't have factory navigation, then you must install the provided GPS module.
3. If vehicle does not have middle dash speaker, then the two speaker wires in the provided Android harness are not used.
4. Install Harness - Camera +12V, Rear Camera RCA’s not used in installation if vehicle already equipped with backup camera.
5. On the back of the Android Monitor, plug in two smaller connectors first (if applicable to your application), b/c difficult to install if larger connector first installed
6. [UPDATED] I don’t believe you can connect the Android monitor and get sound output through the oem audio harness alone. You will need to use the OEM AUX IN as described by the manufacturer of the android monitor. You need at least a 4ft Aux Cable (very minimum). Use a high quality aux in cable for best sound results. I went with AudioQuest, FWIW.
7. If, after all connections are made, no OEM display can be seen then cycle through all CAR TYPES first to see if one works. I cycled through 9 and the ninth one worked for me. If still no display, disassemble monitor and check all monitor connectors. I use Car Type:
[09]CIC_F01/F02_7Series(2011)(8.8", 10.25")
8. If you plan to use the Monitor's USBs, you'll likely need an 1m usb extension cable.
9. I created wiring diagrams in Visio showing oem wiring versus android wiring. PM me if you want me to email you a PDF.
10. Just a reminder that the flat black connector that connects into the OEM display is unused in the Android Monitor; tuck it away.
11. If you find the Android and OEM Monitors blank with no power and you CIC (radio) is also out, check fuse 142 (20A) in the trunk.
12. [UPDATED JAN.2021] AUTO DIMMING OPERATIONS:
Key In, Start ON, Engine OFF, Lights Off, Android Brightness Setting 100%
-Both Android and OEM Screens are same brightness
-Dimmer switch does nothing
-OEM>Settings>Control Display>Screen Brightness does nothing
Key In, Start ON, Engine OFF, Lights Off, Android Brightness Setting 0%
-Both Android and OEM Screens are same low dim output
-Dimmer switch does nothing.
-OEM>Settings>Control Display>Screen Brightness does nothing
Key In, Start ON, Engine OFF, Android Brightness Setting 100%
-Both Android and OEM Screens are bright,
I turn on lights, both oem and android screens switch to a random dimmed setting
-Dimmer switch does nothing.
-OEM>Settings>Control Display>Screen Brightness does nothing
Key In, Start ON, Engine OFF, Lights Off, Android Brightness Setting 0%
-Both Android and OEM Screens are dim,
I turn on lights, NO switch to a random dim setting (guessing it's at the lowest already)
-Dimmer switch does nothing.
-OEM>Settings>Control Display>Screen Brightness does nothing
The LIGHTS ON auto dim setting is dependent on the Android brightness setting, with 0% the lowest setting in the system. Another option, if more adjustment is needed, is try the CF Lumens app or equivalent. It adjusts screen brightness automatically to time of day and it may have more adjustment options to fit the needs. NOTE: As I learned from
Nyc Dito The Dimmer Switch and Control Display Screen Brightness settings don't work because the dimming wire remains with the OEM NAV connector that we tuck away once the Android Monitor is installed.
13. [UPDATE 29MAR2021] I recommend immediately after install, take pictures of the settings in FACTORY menus. Then make your changes and do it again. I can't tell you how many times I wanted to know what the original settings were for a particular menu without returning all settings to DEFAULT.
14. A DAC can be used with this system by plugging it into the Android monitor USB cable. Then I recommend purchasing the UAPP player app. The default android audio player equalizer doesn’t work for me when using the DAC. The UAPP equalizer and gain settings are a tremendous help in sound quality and sound equalization between oem and android sides. I summarized my oem and UAPP settings in post #211. Doing this requires extra effort to setup just right and understand the quirks, however when playing your lossless music files you get exceptional sound. If not playing lossless music files, then you probably don’t need to use the DAC. Also not just any DAC works properly, see my post #210 for the extensive trial and error on DACs.
15. Avoid wireless carplay, get the dongle. Several experience skipping with wireless carplay.
16. When in OEM mode listening to audio and then switch to Android mode, the OEM mode continues to play until you make a selection on the Android side that requires sound. This way I was able to listen to OEM satellite radio and view the Waze map. However, you won’t hear the Waze audio until you make an effort to change the audio focus to the Android side.
17. Questions to 4x4 Shop; Thanks to Ray for a response within the hour...
Q: The Android keeps going back to 24hour time, even after setting it to 12 hour in multiple locations.
A: You can go to setting-time-if you select original time will stay with 24 hours, if you select sync to GPS signal, you can do 12 hours format.
Q: The BACK button on the iDrive does not reboot the system per the instructions
A: The back button won’t reboot the system, mistake on the information.
Q: WIFI doesn’t automatically connect, even with settings set to do so;
A: You need to turn off the hotspot from your phone and turn it back on, time out on the hotspot from your phone.
Q: Do you have any insight why some E70 X5 installs don’t need the AUX OUT to OEM AUX IN connection to hear sound?
A: For E70, always need to run the aux cable from the power harness from android to your factory AUX jack.
Q: Is it possible to add the Developer menu option in SETTINGS>SYSTEM>ADVANCED>
DEVELOPER OPTIONS>FEATURE FLAGS>settings_seamless transfer? I would like to switch between audio sources: AUX OUT and USB Audio OUT. I successfully am using USB Audio Out to a DAC and coupled with a specific player app (UAPP).
A: You can activate the developer mode, but we don’t recommend customer to do any modification on that.
Q: Does 4x4 Shop offer a front camera setup compatible with my interior Rear View Mirror setup that has high-beam assistant and rain sensor? [I had to send pix of my cover (51-16-9-216-739)].
A: NO.
Q: How do I connect the TV Tuner?
A: You should have one harness with 4-5 RCA jack on it, that is the one for video and audio input, you can use it for your TV tuner. You can get the power for the tv tuner from your factory cigarette lighter adapter.

Plenty more info in this thread regarding other users installation and issues:
https://www.xbimmers.com/forums/show...highlight=avin
Good luck. Post more if you have them.